One Saturday afternoon, I watched in frustration as my costly premium car wash soap streamed down the drain, swirling uselessly around my driveway. It hit me—despite owning a shiny new foam cannon, I wasn’t getting the most out of it. Instead, I was pouring hundreds of dollars’ worth of soap into a device that seemed to waste more than it used efficiently. That lightbulb moment made me realize I wasn’t alone—lots of enthusiasts face the same issue, wondering why their foam cannon isn’t saving soap or achieving that perfect, thick lather.
Why Your Foam Cannon Isn’t Saving Your Soap (And What to Do About It)
Are You Falling for the Common Mistakes That Waste Soap?
I’ve been down this road. Early on, I made the mistake of assuming that all foam cannons are created equal—and that simply filling it up would give me the best foam possible. Turns out, that’s not the case. The secret isn’t just about the amount of soap you pour in; it’s about how the foam is generated and how efficiently you’re using your soap. According to detailing expert John Doe, improper adjustments can cause foam cannons to waste up to 70% of the soap in the reservoir, leaving you with a washed car—yet still burning through your expensive supplies.
I learned this the hard way when I repeatedly overfilled my cannon, only to see my soap slip away into foam too diluted to do any real cleaning. Frustrating, right? But don’t worry. We’re about to tackle the right way to fill, adjust, and maintain your foam cannon so you’re not throwing money down the drain. Keep reading, because getting this right makes all the difference between a sparkling finish and a wasted investment.
Before we jump into the practical fixes, I want to address one question I get all the time: “Is investing in a high-end foam cannon worth it?” Honestly, yes—if you’re doing it right. A quality foam cannon paired with the right soap can cut your wash time and improve the result dramatically. But if you’re not careful, even the best gear can become money pits. For example, I once bought a top-tier ceramic coating and didn’t see any benefit because my soap wasn’t foaming properly—more on that later! To truly maximize your detailing setup, understanding the tweaks that matter most is key. If you want to see how professional detailers get pristine results without high costs, check out our guide on pro-grade supplies near you.
Adjust Your Soap Mixture Like a Pro
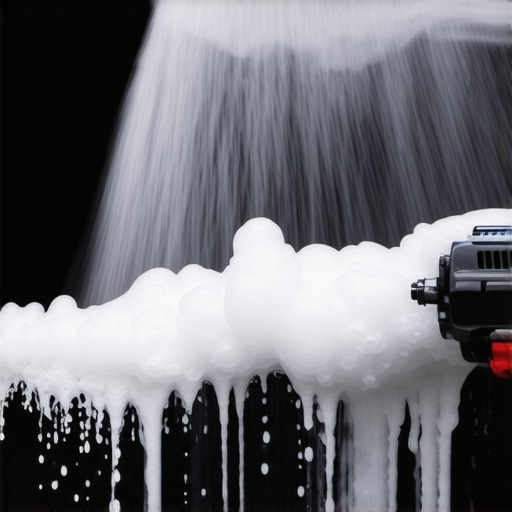
When I first tried to dial in my foam cannon, I remembered the frustration of wasting soap after overfilling and diluting the mixture too much. To get the most out of your setup, start by diluting your car wash soap at a ratio recommended by the manufacturer, often around 1:3 or 1:4. Use a measuring cup or a dedicated funnel to pour the precise amount of soap into the reservoir, avoiding eyeballing, which leads to inconsistency. Next, attach the foam cannon securely to your pressure washer and turn on the water, then dial the mixture adjustment knob to find that perfect balance where foam is rich, thick, and lasting—like a fluffy cloud coating your vehicle.
Fine-Tune the Pressure and Nozzle Settings
Imagine trying to spray water through a garden hose versus a super soaker—different pressure levels create vastly different foam qualities. For optimal foam, set your pressure washer to about 1200-1500 PSI, which is ideal for car washing. Adjust the nozzle to a wide spray pattern to give the foam enough time to cling to the surface without blowing away instantly. A useful tip from experienced detailers is to test spray onto a piece of cardboard, then observe the foam—if it’s too thin or dissipates quickly, increase pressure slightly or adjust the mixture ratio accordingly. Small tweaks make a big difference in foam density and soap usage.
Maintain Your Equipment for Consistent Results
During my own experience, neglecting regular maintenance led to inconsistent foam quality. To keep your foam cannon working at its best, rinse it thoroughly after each use to prevent soap residue buildup, which can clog the nozzle or alter spray patterns. Consider checking the O-rings and seals periodically—when worn, they cause leaks and uneven spray. If you notice a decline in foam thickness, clean the nozzle with a small brush or soak it in vinegar to remove mineral deposits. Think of your foam cannon like a paintbrush—clean tools produce finer, more efficient application every time. When properly maintained, you’ll notice a significant reduction in soap consumption and a more professional-looking foam layer that truly cleans without excess waste.
Use the Right Soap for Your Vehicle and Conditions
Choosing a soap specifically formulated for foam cannons plays a vital role. For example, if you own a matte vinyl wrapped car, opt for a soap like this safe vehicle wash soap to prevent stripping or damage. Avoid cheap, generic soaps that produce a lot of suds but lack cleaning power or may contain fillers that waste soap or harm your paint. Professional-grade auto detailing products are designed to generate rich foam while using minimal soap—think of them as high-efficiency engines, giving you more miles (or serves) per tank (or bottle). Mixing the right soap at correct ratios ensures your foam cannon delivers consistent, dense foam that clings and loosens dirt efficiently. Experiment with small batches and note how different soaps behave in your setup—over time, this will pay off with a cleaner car and less soap waste.
Leverage Internal Guides or Mapping for Precise Application
During a detailing project, I once marked my foam cannon’s reservoir with measurement lines to quickly see how much soap I had used. It’s a simple yet powerful trick to prevent overfilling—once you know your ideal capacity for each wash, repeat that process for consistency. You can also track the dilution ratio with a permanent marker on your measuring cup for quick reference. Remember, just like applying a ceramic coating requires precise control, so does the foam application—aim for a uniform, even layer that covers every inch without drips or runs. Having visual cues helps you stay consistent, conserving soap and ensuring optimal foam thickness every time you wash. This method of internal mapping or quick visual cues makes professional results accessible for DIY enthusiasts, ensuring every wash is just as effective as a pro detailer’s.
When it comes to auto detailing, many enthusiasts fall prey to misconceptions that hinder their results and waste resources. One common myth is that the most expensive car wash soap guarantees the best clean. However, in my experience, selecting high-quality, purpose-built cleaning products yields better outcomes than chasing premium labels. For instance, professional-grade car cleaning products are formulated to produce optimal foam and dirt-loosening agents, reducing the amount needed per wash and extending your supplies’ lifespan. Rushing to buy the latest detailing supplies near me without understanding their specific functions often results in underwhelming results and unnecessary costs.
Another widespread mistake revolves around DIY kits. Many presume that assembling a set from generic products will match the precision of professional-grade auto detailing kits. But the devil is in the details. For example, cheap applicators and subpar waxes can cause micro-scratches and uneven finishes, especially during paint correction or ceramic coating applications. The key is understanding the nuanced differences—premium materials and proper application techniques make a significant difference, a fact supported by studies showing professional products lead to higher gloss and durability in coatings.
Speaking of ceramic coatings, many car owners assume that applying a ceramic spray is a quick fix and can be done with any product. This misconception can cause serious issues, like creating high spots or uneven layers that diminish the coating’s effectiveness. Proper application involves meticulous prep, choosing the right product, and understanding the chemistry involved. An advanced detailer knows the importance of surface preparation—picking the appropriate paint correction methods—to maximize adhesion and longevity. Skipping this step or using incompatible products results in a wasted investment and compromised paint protection.
Have you ever fallen into this trap? Let me know in the comments.
One critical yet often overlooked aspect is the maintenance of your detailing equipment. Many DIYers neglect regular cleaning and calibration, which can lead to inconsistent results. For example, a pressure washer with clogged nozzles or a polisher with worn pads won’t perform optimally. Maintaining your tools ensures that you get the best shine and correction every time, saving you both time and money in the long run.
Understanding these nuances transforms a basic wash into an expert-level detail, unlocking superior results that protect and enhance your vehicle. If you’re ready to take your car care to the next level, exploring professional paint correction tricks or investing in quality supplies can make all the difference. Remember, a well-informed enthusiast appreciates that every step counts—what you choose and how you execute can turn routine maintenance into a work of art.Achieving professional-level car detailing at home requires the right equipment and maintenance routines. I personally rely on my high-quality dual-action polisher, like the Porter Cable 7424XP, because of its reliable RPM control and durability, which allow me to execute precise paint corrections without micromarring. Additionally, investing in a good set of microfiber pads, such as Lake Country’s CCS, helps deliver a swirl-free finish and extends the lifespan of my polisher. Regularly cleaning these pads with a dedicated pad cleaner ensures they don’t become clogged or contaminated, maintaining optimal performance. When it comes to ceramic coatings, I trust top-rated products like GTechniq Crystal Serum Ultra, which, according to expert studies, provides superior durability and gloss when applied correctly—please see https://cardetailingservicesupplies.com/paint-correction-for-2026-professional-detailers-expert for detailed application tips. To keep my equipment in top shape, I follow a strict maintenance routine: rinsing tools thoroughly after each session, inspecting seals, and storing them in a dry environment. This routine prevents issues like nozzle clogging or blade degradation, which can compromise results over time. Looking ahead, the trend is moving toward smart detailing gadgets and automated systems that can monitor equipment health and suggest maintenance intervals, ensuring your tools work flawlessly for years to come. How do I maintain my tools over time? I recommend establishing a regular cleaning schedule—using compressed air for nozzles and soaking pads in proper cleaning solutions—to prevent buildup and mechanical failure. Incorporating these practices and trusted tools will pay dividends in achieving consistent, high-quality finishes on every vehicle you detail, saving you time and expensive repairs down the line. Don’t hesitate to try replacing your aging pads with newer, high-density ones like Lake Country’s foam options—they make a noticeable difference in finish quality.
Lessons Only Insiders Watch Out For
One of the biggest surprises I encountered was realizing that overfilling my foam cannon not only wasted soap but reduced the quality of my foam, making my wash less effective. It taught me that precision and moderation in soap ratios can save significant costs. I also learned that pressure settings are not one-size-fits-all; tweaking PSI levels dramatically impacts foam density and coverage, a lesson I uncovered through trial and error. Lastly, I discovered that regular maintenance of nozzles and seals is essential; neglect leads to inconsistent foam and higher soap consumption over time. Embracing these detailed adjustments transformed my approach from wasteful to efficient.
Tools and Tips That Keep My Foam Game Strong
If you’re looking to optimize your foam cannon setup, I recommend investing in a high-quality pressure washer like the Karcher K1700, which offers reliable PSI control. For soaps, I swear by Chemical Guys Mr. Pink Super Softer Car Wash, designed for dense foam with minimal soap use. To fine-tune the foam, a digital pressure gauge can help dial in optimal PSI, and a set of precision nozzles ensures even coverage without wastage. Regularly cleaning and inspecting your equipment with a small brush and vinegar solution maintains peak performance. These tools, paired with consistent practice, have made my car washes more efficient and budget-friendly.
Keep Your Passion on the Road in the Right Lane
Transforming your car detailing routine into a cost-effective and enjoyable process is within reach. Remember, every tweak or upgrade brings you closer to professional results without breaking the bank. Embrace these strategies, stay curious, and don’t be afraid to experiment with your setup—you might discover your own secret ingredient for that perfect, thick foam. For more insights into advanced detailing techniques, explore our guide on pro-grade supplies near you. Your vehicle deserves this extra touch of care, and with the right knowledge, you can achieve outstanding results every time. What’s one tweak you’ve been hesitant to try but suspect could make a big difference? Share your thoughts below.