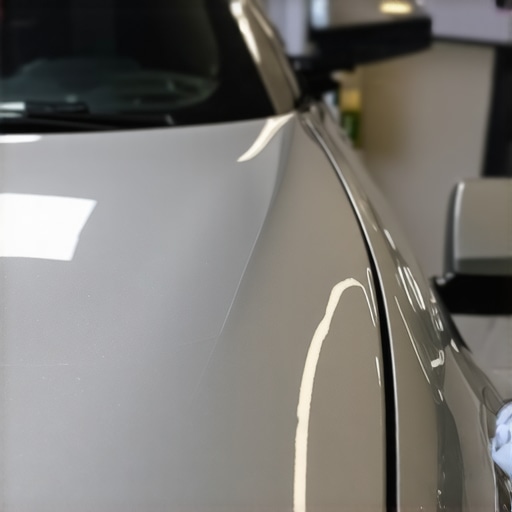
I’ll never forget the moment I realized those tiny scratches on my 2026 paint job weren’t just annoying—they were a sign of deeper issues. I was in West Los Angeles, freshly cleaned and looking at my car’s gleaming surface when a stray pebble caught my eye, leaving a faint but visible scratch on the clear coat. It was a lightbulb moment—those scratches looked harmless initially, but they threatened the integrity of my vehicle’s finish.
Everyone who’s into detailing knows the feeling. Scratches can feel like the end of the world, especially when they appear unexpectedly. But what if I told you that not all scratches require aggressive sanding or costly body work? That’s exactly what I’ll share today—proven methods to repair 2026 clear coat scratches without sanding, right at home.
The Importance of Quick, DIY Solutions to Clear Coat Scratches
In my experience, the sooner you address scratches on your vehicle’s clear coat, the better. Ignoring minor imperfections can lead to corrosion and more extensive damage over time. And let’s be honest—going to a body shop isn’t always practical or affordable. With the right supplies and some basic know-how, you can effectively tackle these issues yourself, saving both time and money.
There’s a common misconception that scratches on the clear coat are hopeless—many folks think sanding down the imperfection is the only fix. But modern detailing supplies near me now include specialized compounds and polishes designed for one-step correction. These products can hide or even remove scratches without damaging your paint.
Early on, I made the mistake of using rough abrasive pads and forgetting to test on a small area first. That only made things worse. Trust me, understanding what works and what doesn’t is key. We’ll walk through the simplest, most effective methods to restore your car’s finish without risking further harm.
Have you ever faced deep scratches that refused to budge with ordinary polish? You’re not alone. Let’s ensure you avoid common pitfalls and get those tiny flaws back to a glossy perfection.
Prepare Your Workspace and Gather Supplies
Start by clearing a clean, well-lit space in your garage or driveway. Collect high-quality detailing supplies like a one-step polishing compound, microfiber towels, and a soft foam applicator from local DIY car detailing kits. Think of this as gathering your toolbox before fixing a delicate watch—precision matters. Remember, choosing the right car wash supplies ensures better results and prevents further damage.
Clean and Inspect the Affected Area
Wash your car thoroughly using a gentle soap to remove dirt and debris—this is akin to prepping a canvas for artwork. Pay special attention to the scratched area, inspecting whether the scratches are superficial or penetrating deeper layers. For minor scratches, this cleaning phase is critical to prevent grit from scratching the paint further during correction.
Apply a Specialized Paint Correction Compound
Using a foam applicator, take a small amount of the buffing compound designed for single-step correction. Think of it as smoothing out tiny imperfections with a gentle hand—like sanding a rough wooden surface but without heavy abrasive action. Work in small circular motions, applying moderate pressure. I recall a time I accidentally used too much product, making a mess; this taught me the importance of sparing, even application. If you’re uncertain, a quick test on a hidden spot helps avoid uneven gloss or swirl marks.
Fine-Tune with a Microfiber Polish
After initial correction, clear the area with a clean microfiber towel to remove excess compound. Then, use a second microfiber cloth to buff the surface gently, revealing a glossy finish. This step acts like polishing a mirror—smooth, even, and reflective. Microfiber cloths are essential here; they catch dust and compound residues without scratching, unlike rough towels or paper products. Remember, a good microfiber towel can change your entire detailing game.
Seal and Protect the Repaired Surface
Once satisfied with the correction, apply a sealant or a ceramic spray wax to lock in the gloss and add durability. Think of this as your vehicle’s armor—protecting against future scratches and environmental damage. For a long-lasting shield, proper application is key. If your car already has a ceramic coating, maintain it using dedicated maintenance products. Regularly inspecting and reapplying protective layers helps keep your gloss intact, especially in high-traffic areas where scratches are more likely to appear.
Review and Final Touches
Step back and examine your work under good lighting. If you notice uneven patches, repeat the application process on those spots. Remember, patience and gentle handling are vital—rushing can undo all your effort. Over time, with consistent upkeep and mindful cleaning, your car’s finish will stay sleek and free of minor scratches, ensuring you can show off that flawless shine even in West Los Angeles’ sunny streets.
 While many car enthusiasts and DIYers focus on choosing the right products, there’s a lot of misinformation about car wash soap, detailing supplies, and ceramic coatings that can hinder your results. One pervasive myth is that all synthetic car wash soaps are equally effective. In reality, the pH balance and formulation are vital—neutral pH soaps are gentler on your vehicle’s paint and protective layers, reducing the risk of stripping wax or ceramic coatings. Many assume that a cheaper product will perform just as well as premium options, but quality makes a significant difference, especially when it comes to paint correction and maintaining a high-gloss finish. Skimping here can cause micro-scratches or diminish the longevity of your paint protection.
Another common misconception involves ceramic coatings. Some believe that once applied, they require little to no maintenance, but in fact, proper upkeep with tailored car wash supplies enhances their durability. Using improper cleaners or harsh brushes can damage the coating, leading to uneven gloss or early failure. For example, high-pressure washers with abrasive nozzles might seem efficient but can harm the delicate hydrophobic layers. Instead, considering the right DIY ceramic coating maintenance kits ensures longevity.
The
Upgrade Your Equipment for Long-Term Success
Investing in quality tools makes all the difference in maintaining a pristine vehicle. I personally rely on a professional-grade pressure nozzle that allows me to adjust water flow precisely, preventing damage to delicate surfaces like painted trim or ceramic coatings. A variable-pressure spray gun is essential; it helps you rinse without risking scratches or stripping protective layers, especially around sensitive areas such as wheel arches or emblems.
Another indispensable piece of equipment is a portable generator. It guarantees a steady power supply during mobile detailing jobs, ensuring your equipment runs smoothly regardless of location. As I regularly work outdoors, a reliable generator helps maintain consistent water pressure and keeps my electric buffers charged, making the process seamless and efficient.
Long-Term Care Requires Proper Maintenance of Your Supplies
Maintaining your tools isn’t just about cleaning after each use—it involves periodic checks and replacements to ensure peak performance. For example, regularly inspecting your microfiber towels is crucial—they should be free of frays or stubborn residues. I find that storing them in a dedicated, breathable organizer minimizes cross-contamination and prolongs their lifespan.
Similarly, keep your polishing compounds and waxes in a cool, dry place, away from direct sunlight. Over time, exposure can dry out or separate the product, diminishing effectiveness. Using a tool bag with individual compartments helps organize while shielding your supplies from environmental damage. These practices extend the functionality of your investments, ensuring every detail job begins with optimal tools and materials.
Anticipate Future Trends in Detailing Equipment
Advancements like cordless electric polishers with ergonomic grips and smart temperature controls are making professional-grade results more accessible. As technology progresses, I predict an increased focus on automation and AI-driven assessment tools that can suggest the perfect polish or protectant combination based on your vehicle’s condition. Staying updated on these innovations will give you a significant advantage, especially when sourcing latest cordless polishers or automation kits to streamline your workflow.
Keep Your Equipment Performing Like New
How do I maintain my detailing tools over time? The key lies in consistent cleaning after each session—rinsing cloths and brushes thoroughly and storing them properly to prevent bacteria buildup. For electric tools, regular inspection and calibration help maintain accuracy, especially when performing paint correction or applying ceramic coatings. Following manufacturer guidelines, like those outlined by industry experts in professional detailing organizations, ensures your tools deliver professional results every time. Make it a habit to check your supplies weekly, and replace worn-out components promptly to avoid compromised performance. To enhance your detailing experience, I encourage you to try using a top-tier buffing compound with your rotary polisher—it’s a game-changer for achieving flawless paint correction with fewer passes and less operator fatigue.
Over the years, I’ve learned that the real secret to keeping your vehicle looking pristine isn’t just about having the latest products—it’s about understanding the nuances of paint chemistry and knowing when to apply them. One of the most valuable lessons I discovered is that patience and precise technique can make DIY scratch repair both effective and satisfying, even on a high-end 2026 paint finish. The experience taught me that rushing through the process can lead to micro scratches or uneven gloss, which ironically complicates future detailing efforts. So, I now approach each scratch with a calm mind, carefully selecting the right compounds and tools, and paying close attention to the manufacturer’s instructions. This method not only preserves the integrity of your beautiful clear coat but also boosts your confidence in handling minor blemishes yourself, saving time and money in the long run.
Another insight I gained is the importance of thorough surface preparation. Rushing to apply compounds over a dirty or dusty area is a recipe for swirl marks and subpar results. I now make it a point to wash and inspect the affected zone meticulously. This extra step ensures that you’re correcting the root cause, not just covering the symptom. It’s like preparing a canvas before painting—clean and smooth surfaces are essential for a flawless finish. Incorporating a detailed inspection process into your routine elevates your detailing game from amateur to professional, particularly when working with sensitive surfaces like the 2026 clear coat, which benefits immensely from tailored products and gentle handling.
Lastly, I’ve realized that sealing and protecting your repairs is equally critical. Applying a top coat or ceramic spray after correction not only enhances gloss but also fortifies your work against future scratches and environmental damage. This proactive approach is what sets a good detailer apart from a great one. By integrating these protective measures, you ensure your vehicle’s finish remains vibrant and resilient, standing up to the challenges of daily driving and West Los Angeles’ sunny conditions. Remember, your vehicle is an investment—treat it with the care and precision it deserves, and you’ll enjoy that mirror-like shine for years to come.
About the Author
Timothy Carr
Tactical Vehicle Training, Sales Support, and Parts ...
Timothy Carr is a seasoned professional with a diverse background in tactical vehicle training, parts management, and safety branding. Having managed critical aspects of branding and safety programs for the United States Army in Kuwait, Timothy brings a unique, high-stakes perspective to the world of vehicle maintenance and care. His extensive experience in tactical vehicle operations and sales support provides him with a deep understanding of the technical requirements and high-performance standards necessary for maintaining vehicles in demanding environments. At cardetailingservicesupplies.com, Timothy leverages his expertise in vehicle parts and safety protocols to provide authoritative insights into the best practices for car detailing and supply management. His professional history in designing safety programs and managing complex vehicle logistics ensures that his advice is both practical and grounded in rigorous standards. Timothy is dedicated to translating his high-level technical knowledge into accessible, actionable advice for car enthusiasts and professional detailers alike. He is passionate about helping others achieve excellence in vehicle maintenance and ensuring that every car receives the professional care it deserves to perform at its best.
LinkedIn Profile