It was one of those mornings in West Los Angeles when I spent more time fighting with stubborn dirt and swirl marks than actually enjoying my meticulously detailed car. I had just finished with my usual car wash supplies and was about to give up, feeling the frustration creeping in. That was the lightbulb moment: I realized my mistake wasn’t in the products I was using, but in not understanding when to bring out the big guns—specifically, the DA (Dual Action) polisher—for paint correction. If you’re like me, you’ve probably wondered whether your current approach is enough or if you’re missing out on that perfect, glossy finish.
Knowing the Right Time to Use a DA Polisher
Deciding when to use a DA polisher can feel like walking a tightrope—too early, and you risk damaging your paint; too late, and you might not achieve the clarity and depth you’re after. Early in my detailing journey, I made the mistake of jumping straight into aggressive polishing, which led to more scratches and a duller finish. It was only after stepping back and learning the nuances that I could better evaluate when a DA polisher would truly make a difference. I’ve found that understanding your car’s paint condition and your desired results is key to making the right call. For a comprehensive breakdown of local services that can assist you, check out [this guide](https://cardetailingservicesupplies.com/2026-local-detailing-services-finding-near-me-shops).
What Do You Actually Need Your DA Polisher For?
Is the swirl or haze on your paint more stubborn than your usual hand polish can handle? Do you notice oxidation, deep scratches, or dullness that your regular car wash supplies just can’t fix? If you answered yes to these questions, then it might be time to bring in a DA polisher. This versatile tool is designed to remove imperfections efficiently without the risks associated with rotary polishers. But, here’s the thing—misusing it, especially without proper technique or products, can do more harm than good. I learned this the hard way, forgetting that not all paint needs aggressive correction; sometimes, gentler methods suffice. For tips on choosing the best pads for heavy oxidation, visit [this article](https://cardetailingservicesupplies.com/2026-paint-correction-best-pads-for-heavy-oxidation).
Have you faced a similar dilemma—wondering whether your car’s paint needs a gentle touch or a firm hand? Rest assured, understanding the right moments to escalate your paint correction will save you time, money, and potential headaches. Let’s dive into how to tell exactly when a DA polisher is your best friend in achieving that showroom shine.
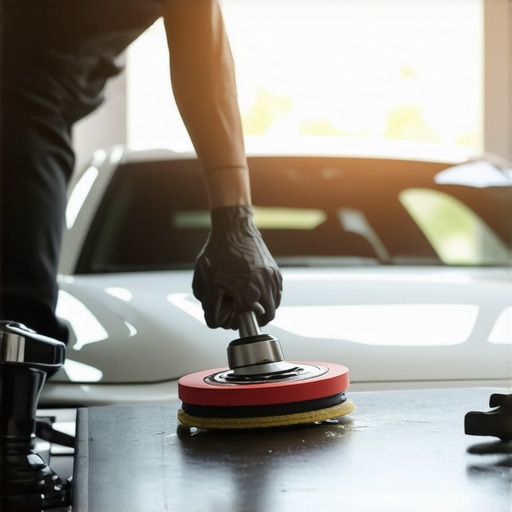
Prepare your workspace and tools
Start by organizing your car detailing supplies. Gather your DA (Dual Action) polisher, appropriate pads, paint correction compounds, masking tape, microfiber towels, and safety gear. Set up a shaded, dust-free area to prevent debris from settling on your freshly polished paint. Ensure your mobile detailing equipment, like portable lights and extension cords, are ready for optimal visibility and power. For comprehensive info on setup, see this comparison of mobile detailing power sources.
Assess the paint condition precisely
Before any correction, inspect your vehicle thoroughly in good lighting. Look for swirl marks, haze, oxidation, or deep scratches. Use a clean clay bar and lubricant to check for bonded contaminants. Remember, not every imperfection requires aggressive correction; some surface issues can be addressed with lighter polishings. My first attempt involved jumping straight into heavy compound use, which left swirl marks I had to fix later—lesson learned. Accurate assessment saves time and preserves your paint. For tips on evaluating your finish, visit this detailed guide.
Select the right polishing compounds and pads
Pick compounds suited to your paint’s severity. For mild haze, a finishing polish may suffice; for deeper scratches, opt for a cutting compound. Pair these with foam pads—specifically designed for paint correction—to optimize cut and gloss. Foam pads move more smoothly over the surface, reducing the risk of marring. I once used a wool pad for heavy oxidation, but switched to foam after realizing its superior control and less heat buildup—especially important for delicate finishes like those on black or exotic paints. For pad recommendations, see this resource.
Master the proper polishing technique
Attach the appropriate pad to your DA polisher. Use a slow speed to spread the compound evenly over a 2×2-foot section. Keep the polisher moving—don’t stay in one spot—to prevent heat buildup, which can cause paint damage. Apply light to moderate pressure—think of guiding the machine as if you’re stroking a baby’s cheek, gentle yet firm enough to spread product evenly. During my first try, I pressed too hard, resulting in holograms, a common mistake for beginners. Practicing consistent, overlapping passes ensures even correction and gloss. For detailed technique, consult this expert tutorial.
Wipe away residue diligently
Once a section is corrected, switch to a clean microfiber towel to remove excess compound and debris. Inspect the results under good lighting. If imperfections remain, repeat the process. For stubborn spots, consider switching to finer polish pads or compounds, as seen in this cleaning accessories guide. Avoid rushing; patience ensures a mirror-like finish. Remember, proper removal prevents hazing or clouding that can ruin your hard work.
Maintain and protect your fresh correction
After achieving the desired clarity, apply a paint protector like a ceramic coating or sealant. This shields your work from environmental damage and makes future cleaning easier. Proper surface prep, including thorough cleaning and decontamination, enhances adhesion. I once neglected this step and saw rapid oxidation, prompting me to revisit and reapply protection, emphasizing the importance of thoroughness. For more on paint protection, check this article.
When it comes to auto detailing, many enthusiasts believe that selecting the most expensive or popular cleaning products guarantees the best results. However, let’s dig deeper into what most people get wrong about car wash soaps and supplies. Contrary to common belief, not all products with flashy labels or high price tags are right for every situation. The real secret lies in understanding the specific nuances of your vehicle’s paint and surfaces. For instance, using a generic car wash soap, even if it’s highly praised, might strip away existing paint protection coatings, especially if it isn’t pH-balanced. A common myth is that a stronger detergent cleans better; in reality, it can cause microabrasions and dull the finish over time. As an advanced detailer, I always recommend assessing your car’s unique needs before choosing products. For those with delicate finishes or specific coatings like ceramic or graphene, selecting compatible cleaning agents is crucial. In fact, tests show that using the wrong cleaners can reduce the lifespan of protective layers by up to 30%, as highlighted in a 2022 study by the Auto Care Association. Have you ever fallen into this trap? Let me know in the comments.
Are You Overlooking the Subtle Art of Product Compatibility?
Many detailers, especially those in West Los Angeles, rely on a quick fix—buying a one-size-fits-all soap or supply without thorough knowledge. This can lead to unintended consequences like streaks, hazing, or even damaging your paint. The key is to understand the chemical makeup of your chosen products. For example, high-alkaline cleaners are excellent for heavy dirt but detrimental for coated surfaces. Moreover, employing incompatible paint protection products, like using wax over a fresh ceramic coating, can hinder performance and durability. This misstep is often made in DIY kits, where users assume that all products are interchangeable. To avoid this, consult detailed guides such as the one on [paint correction and protective coatings](https://cardetailingservicesupplies.com/why-2026-ceramic-coatings-need-a-yearly-reload-spray). Remember, proper product compatibility preserves your investment and ensures a stellar shine that lasts longer.
Another mistake involves neglecting the importance of proper tools, especially mobile detailing equipment. Using abrasive pads or rough sponges alongside gentle cleansers defeats the purpose of the product’s intention. Upgrading to foam pads or microfiber towels designed for specific products can significantly improve results. For example, foam pads are not only better for gentle cleaning but also extend product life and reduce application time, especially when paired with quality car wash supplies. To master this, check out the [best foam pads for paint protection](https://cardetailingservicesupplies.com/why-2026-car-detailing-supplies-are-moving-to-foam-pads).
The secret to excellence is in the details—literally. The next time you pick a product, ask yourself: Does this suit my vehicle’s surface, my coating, and the job at hand? If not, you run the risk of compromising your finish. Optimizing the use of car cleaning products isn’t just about purchasing; it’s about precision and understanding. Have you ever overlooked this aspect? Share your experiences below.
Keep Your Equipment Running Smoothly
One of the biggest challenges in auto detailing is maintaining your tools to ensure consistent, professional results. Personally, I rely heavily on high-quality electric polishers like the Porter Cable 7424XP—it’s a workhorse that offers reliable performance without overwhelming beginners. Regularly checking and replacing worn-out pads and brushes is crucial; I prefer foam pads over microfiber for their durability and finish quality, especially when paired with the right compounds. For mobile detailers, investing in a dedicated power inverter ensures continuous operation, particularly when working at remote locations. Proper storage also prolongs equipment life—storing pads in sealed containers prevents dust buildup and contamination, which can compromise polishing outcomes.
Anticipating future trends, I believe advancements in cordless, battery-powered tools will dominate, making mobile detailing even more efficient. Innovations like multi-voltage battery systems will reduce downtime, allowing you to maintain a high throughput without sacrificing quality.
How do I keep my tools in top shape over time?
Routine maintenance starts with cleaning your polisher and accessories after each use—using compressed air and gentle detergents prevents residue build-up that can impair performance. Replace worn pads proactively; for example, swapping foam pads every 20-30 hours of use maintains optimal cut and gloss. Lubricate moving parts per the manufacturer’s instructions to avoid mechanical failures. I also apply a light coating of protective spray on metal components to prevent rust, especially if working in humid environments. For detailed guidance on preserving your gear, see this resource. Additionally, referencing technical manuals such as the Bosch Power Tools Maintenance Guide can offer specific, in-depth advice to extend your equipment’s lifespan, as documented in their official safety and maintenance protocols. Incorporate these practices into your routine to ensure your tools stay efficient and reliable for years to come.
When managing multiple vehicles or scaling your operation, consider calibrating your equipment regularly to maintain consistency across jobs. Using calibration tools recommended by manufacturers or industry experts ensures your polishing angles and pressures remain precise, leading to superior, long-lasting results. I encourage you to test one advanced maintenance tip today: replace your standard foam pads with a premium, HDPE-backed foam variant, which resists heat and wear longer, ultimately saving you time and money on replacements. This small adjustment can significantly impact your long-term efficiency and output quality, especially when working with delicate finishes or coatings.
Reflecting on my detailing journey, I realized that the most significant breakthroughs often came from embracing patience and continuous learning. The first time I attempted paint correction with a DA polisher, I jumped too quickly into aggressive polishing, which left my paint with holograms and micro-marring. That lightbulb moment taught me to assess my car’s paint condition meticulously and choose the correct compounds and pads—a step I previously overlooked. Over time, I learned that understanding your vehicle’s unique paint profile and not rushing the process leads to stunning results. Remember, investing time in proper technique and product selection—like consulting resources on paint correction strategies—can elevate your detailing game significantly.
About the Author
Timothy Carr
Tactical Vehicle Training, Sales Support, and Parts ...
Timothy Carr is a seasoned professional with a diverse background in tactical vehicle training, parts management, and safety branding. Having managed critical aspects of branding and safety programs for the United States Army in Kuwait, Timothy brings a unique, high-stakes perspective to the world of vehicle maintenance and care. His extensive experience in tactical vehicle operations and sales support provides him with a deep understanding of the technical requirements and high-performance standards necessary for maintaining vehicles in demanding environments. At cardetailingservicesupplies.com, Timothy leverages his expertise in vehicle parts and safety protocols to provide authoritative insights into the best practices for car detailing and supply management. His professional history in designing safety programs and managing complex vehicle logistics ensures that his advice is both practical and grounded in rigorous standards. Timothy is dedicated to translating his high-level technical knowledge into accessible, actionable advice for car enthusiasts and professional detailers alike. He is passionate about helping others achieve excellence in vehicle maintenance and ensuring that every car receives the professional care it deserves to perform at its best.
LinkedIn Profile