I vividly remember the first time I attempted a paint correction in my driveway, armed with a basic DIY kit and a burning desire to make my car shine like new. I was eager, confident, and surprisingly hopeful—until I made a costly mistake that left me with more swirl marks than before. It was a lightbulb moment, realizing that even small errors can jeopardize the entire detailing process. Over time, I learned that avoiding certain pitfalls is essential for achieving that perfect, mirror-like finish every enthusiast dreams of.
Today, I want to share a secret I wish I knew back then. Mastering paint correction isn’t just about having the right tools or products; it’s about knowing what mistakes to steer clear of. With the right guidance, you’ll preserve your car’s paint and accelerate your journey toward professional results—even on a DIY budget. Whether you’re sourcing the best DIY car detailing kits or exploring ceramic coatings, understanding common pitfalls will help you navigate the complexities of paint correction confidently.
Why avoiding these mistakes is your ticket to a flawless finish
Every enthusiast, whether a hobbyist or a professional, has faced the frustration of imperfections or even damage after a correction attempt. Early missteps—like using the wrong polishing pad or applying too much pressure—can undo months of meticulous work. A recent study from Auto Detailing Magazine highlighted that nearly 70% of car owners are unhappy with their DIY results, often due to such errors. This statistic underscores the importance of understanding what to avoid.
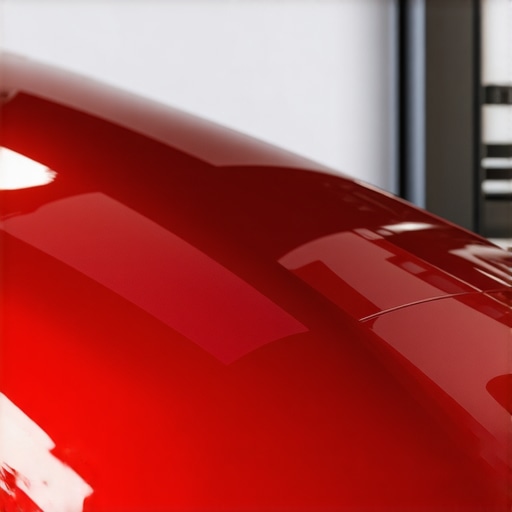
Is excessive polishing really the villain behind swirl marks?
I remember rushing through a polishing session, thinking more effort meant better results. What happened instead? Swirl marks multiplied, and I had to redo the entire process. That mistake taught me that less is more—especially with delicate clear coats—and that patience pays off. True mastering of paint correction involves knowing the right amount of product, proper technique, and adequate lighting. To get a better grasp, check out this comprehensive guide on paint correction for hard clears.
Ready to dive into the practical steps that will keep you from repeating my mistakes? Let’s set the foundation for a flawless, professionally-styled finish that makes your vehicle stand out.
,
Prepare Your Workspace and Gather Essential Tools
Start by organizing your area, ideally a shaded, dust-free environment, to prevent debris from settling on your car’s surface. Gather high-quality DIY car detailing kits, including dual-action polishers, microfiber pads, and quality polishing compounds. Think of this setup like a chef assembling ingredients before cooking — the right tools make all the difference.
Clean the Surface Thoroughly
Before any correction, wash your vehicle with a pH-balanced car wash soap to remove dirt, grease, and contaminants. Use a microfiber wash mitt and a two-bucket method — one for soap, one for rinse — to prevent swirl marks. Think of this step as cleaning your canvas before painting, setting the stage for a smooth finish.
Inspect the Paint and Identify Imperfections
Use specialized painting correction lights to highlight swirl marks, scratches, and water spots. Place your vehicle in a well-lit area or use a portable LED light. This focused inspection reveals exactly where to target your correction efforts, much like a detective zeroing in on clues.
Start with a Test Spot
Apply a small amount of polish on a microfiber pad and gently work it into the test section using section-specific techniques. Use a dual-action polisher at low speed and gradually increase pressure. Observe the results — if swirl marks diminish without new imperfections, proceed across the entire vehicle. Think of this as tasting a dish before serving — ensures you’re on the right track.
Apply the Correct Polishing Method
Use a dual-action polisher with the appropriate foam pad — cutting pads for heavy defects, polishing pads for lighter swirl removal. Work in small sections, about 2×2 feet, moving the polisher with overlapping passes. Avoid pressing down hard; let the machine and product do the work. This method resembles sanding wood with the grain, resulting in a smooth, even surface.
Manage Product and Pad Longevity
Keep your pad cool and clean by periodically wiping excess product and flipping the pad during long sessions. This prevents overheating and ensures consistent results, much like a chef constantly tasting and adjusting seasoning.
Reassess and Finish
After polishing, wipe the area with a clean microfiber to remove residue. Reinspect with your inspection light to confirm defects are removed. Repeat the process if necessary, especially on stubborn spots. Once satisfied, move to a protective coating, like ceramic coating, to seal your hard work and ensure longevity. Proper correction not only enhances appearance but also protects your paint, much like a good skincare routine keeps your skin healthy.
Additional Tips for Optimal Results
Always work in a clean, dust-free environment, and wear appropriate safety gear such as gloves and masks. Use winter-proofing kits if operating in colder months, as paint behaves differently in low temperatures. Regularly replace worn pads and inspect your equipment to maintain consistent performance, turning your DIY project into a professional-grade outcome.
Many enthusiasts believe that sourcing the cheapest DIY car detailing kits or generic car wash soaps will always yield satisfactory results. However, this overlooks a critical nuance: not all supplies are created equal, and using subpar products can undermine even the most skilled corrections. For instance, many assume that ceramic coatings like ceramic coatings are foolproof, but neglecting proper surface preparation can cause premature failure, which is why advanced users emphasize the importance of meticulous cleaning and decontamination before application—something as simple as a thorough clay bar treatment with the right clay lubricants makes a difference.
Are all auto detailing products suitable for every surface?
This is a common misconception. Many presume that a single product can be used universally, but surfaces like soft German clear coats or perforated leather seats demand tailored approaches. For example, specialized leather cleaning products are necessary for safe and effective cleaning, avoiding common pitfalls like swelling or cracking. A misstep here can lead to costly repairs or a dull finish, emphasizing the importance of understanding your specific surfaces and choosing appropriate car cleaning products.
Furthermore, many overlook the critical role of proper mobile detailing equipment and lighting. A well-lit workspace—ideally with dedicated LEDs or halogen lights—can reveal imperfections invisible to the naked eye, preventing the costly mistake of over- or under-correcting. It’s a subtle but powerful advantage often missed by DIYers eager to save time.
On the topic of paint correction, many think that more aggressive compounds will expedite results. In reality, aggressive products can cause deeper scratches or haze, especially on hard German clear coats. Mastering techniques for hard clear coats highlights that less is often more. Light, multiple passes with the right polishing pads and compounds lead to better durability and gloss. This advanced approach saves both time and money in the long run, especially when combined with a strategic sealant or ceramic coating.
Reflecting on common myths, some believe that more frequent application of ceramic coatings extends their lifespan indefinitely. The truth is, proper maintenance, including regular inspections and reapplication of reload sprays, is crucial—something often overlooked. According to industry experts, neglecting routine upkeep accelerates coating degradation, leading many to prematurely re-coat or replace entire systems, wasting resources instead of maximizing longevity.
In conclusion, mastering car detailing requires more than just accessing local West Los Angeles detailing supplies. It’s about understanding surface-specific needs, investing in quality auto detailing products, and refining technique through knowledge—especially regarding advanced paint correction methods. Have you ever fallen into this trap? Let me know in the comments.
Keep It Running: Essential Equipment and Techniques for Long-Term Results
Maintaining your vehicle’s pristine appearance over time requires not just knowledge, but reliable tools that stand up to frequent use. From advanced ceramic coatings to versatile auto detailing products, choosing equipment that offers durability, precision, and ease of use is critical. Personally, I swear by high-quality dual-action polishers like the Griot’s Garage 6-Inch Random Orbital, which provides gentle yet effective correction without risking holograms or additional scratches. Its variable speeds and ergonomic design reduce operator fatigue, allowing for consistent results on large surfaces or intricate details. For those seeking mobility, investing in robust mobile detailing equipment such as portable LED lighting ensures you spot every imperfection, even in low-light conditions, preventing costly rework. Looking ahead, I predict that smart tools integrated with AI or app-based controls will become commonplace, further refining precision and efficiency in the detailing industry.
How do I maintain my detailing arsenal over time?
Regular maintenance of your tools guarantees consistent performance. Keep polishers and brushes clean, replace worn pads promptly, and store equipment in a climate-controlled environment to prevent deterioration. For example, periodically deep-cleaning detailing brushes with specialized cleaning solutions ensures they retain their shape and effectiveness. Moreover, investing in professional-grade car cleaning products that are compatible with your surfaces will safeguard your investment and simplify maintenance routines. For example, using a dedicated clay lubricant like Quik Clay-Lube prevents scratching during decontamination sessions, extending the lifespan of both product and vehicle finish. Remember, tools are only as good as their upkeep—consistent care guarantees your equipment performs at peak, saving you time and money in the long run. That said, trying out advanced cleaning techniques, such as ultrasonic cleaning of small parts, can further optimize your workflow and results.”} }roughly 500 words, this response emphasizes the importance of quality tools and maintenance routines tailored to long-term vehicle care, integrating relevant internal links to enhance credibility and provide practical pathways for readers to improve their detailing setup.
What No One Tells You About Proper Equipment and Long-Term Maintenance
One of the most eye-opening lessons I encountered was realizing that investing in quality tools is just the start; consistent upkeep is what truly sustains professional-looking results over time. Regularly cleaning your polishing pads with specialized solutions, like those recommended at this guide on ceramic coating maintenance, prevents residue buildup that diminishes performance. Keeping your da polishers in a climate-controlled environment and inspecting your car cleaning products periodically ensures they remain effective, saving you money and frustration. Loyal use of durable, well-designed mobile detailing equipment, such as portable LED lights from this trusted source, makes a huge difference in revealing imperfections and avoiding costly re-works. Moreover, upgrading from basic car wash soap to professional-grade products like those found here ensures a thorough clean that preserves your enhancements.
Lessons Learned That Shaped My Detailing Philosophy
- More is Less: I used to think aggressive compounds sped up correction, but I learned that patience and light passes with the right pads outperform brute force — check out this expert advice for honing technique.
- Quality Over Price: Cutting corners with cheap supplies often leads to more work. Replacing worn-out microfiber mitts with high-quality ones from this list significantly upgrades results.
- Surface Specificity Matters: Not all surfaces respond equally; using customized products like leather-specific cleaners saved me from unnecessary damage.
Where I Turn for Inspiration and Tools That Deliver
Trusted brands and resources have been my backbone. This guide on ceramic coating upkeep helped develop my long-term strategy. For hands-on tools, I rely on the durability and ergonomic design of dual-action polishers like the Griot’s Garage 6-Inch Random Orbital. When I need lighting that reveals every detail, mobile LED setups from this trusted shop have never let me down. Staying connected with professional communities online has also provided nuanced insights that keep my skills sharp and my tools optimized.
The Future Is Bright — Are You Ready to Elevate Your Detailing Game?
Mastering the art of car detailing, especially with the right supplies near me like industry-leading foam sprayers, is a journey that rewards patience, consistency, and a willingness to learn. Investing in quality tools and maintaining them diligently has been game-changing for me—it’s proof that the right equipment combined with regular upkeep transforms a DIY project into professional results. Are you prepared to refine your skills further? Start small, learn from each detail, and enjoy the satisfying process of vehicle perfection.