Ever spent hours scrubbing your beloved vehicle after a heavy mud event, only to end up with disappointing results and a scratched surface? I remember the frustration vividly—finally tackling a muddy trail run, only to realize the car looked worse after washing. That moment was a real lightbulb for me: not all pre-wash products are created equal, especially when heavy mud is involved. Over time, I discovered that the right pre-wash foam can make all the difference, transforming a grueling chore into a straightforward process.
Why Choosing the Correct Pre-Wash Foam Is a Game-Changer
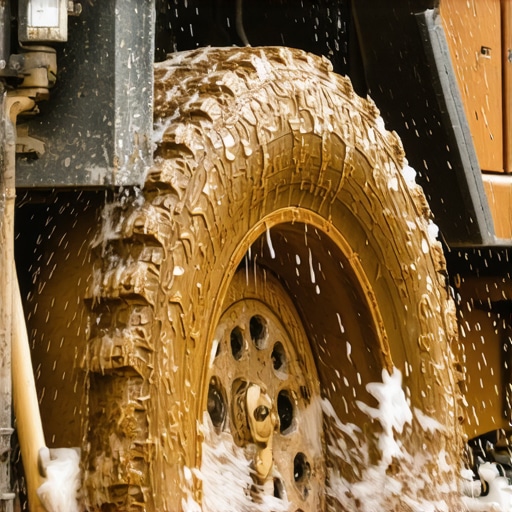
The reality is, heavy mud can be stubborn, clingy, and downright damaging if not handled correctly. The wrong pre-wash product can embed dirt deeper into the paint, making cleaning more difficult and risking scratches. That’s why I started paying close attention to pre-wash foams specifically designed for heavy-duty mud removal. These foams are formulated to encapsulate and loosen dirt before contact with your vehicle’s surface, reducing the risk of marring. From personal experience, I can attest that selecting a high-quality pre-wash not only saves time but preserves your car’s finish, especially in areas with sensitive paint or intricate details.
But here’s the kicker: with so many options, how do you choose the best? My journey involved a lot of trial and error, reading reviews, and consulting industry experts. Interestingly, a study from car-care specialists revealed that proper pre-wash application can reduce paint scratches during washing by up to 70%. Now, that’s a statistic that truly underscores the importance of selecting the right product.
Before I mastered this, I made a common mistake—using regular auto wash soap on muddy vehicles, thinking cleanliness was simply about soap strength. That only pushed dirt into cracks and created more work. So if you’ve ever had that sinking feeling after a wash, wondering if you were doing it right, you’re not alone. There’s an art to pre-wash, especially when dealing with stubborn mud, and luckily, I’ll guide you through it.
Are you tired of wasting time, only to see your vehicle covered in scratches after washing? If so, keep reading. We’ll dive into the best pre-wash foams for 2026 that are proven to handle heavy mud and protect your paint—helping you achieve professional results at home. Plus, I’ll share key tips to avoid common mistakes and make your mud removal process as efficient as possible.
To get started, let’s understand why these specialized foams are essential and how they work their magic. For in-depth maintenance tips that keep your finish pristine, check out this guide on [how to maintain 2026 satin paint finishes](https://cardetailingservicesupplies.com/how-to-maintain-2026-satin-paint-finishes). Ready to make mud removal effortless? Let’s jump in!
Before diving into mud removal, gather all necessary supplies, including a quality pre-wash foam designed for heavy dirt. Use a portable foam cannon attached to your garden hose, like those recommended in mobile detailing hose reels. Ensure your workspace is shaded to prevent rapid drying, which can cause streaks. Setting up your workspace properly is akin to preparing a kitchen before cooking—every tool has its place, and the environment is optimized for efficiency.
Mix your pre-wash foam at the manufacturer’s recommended concentration—usually a dilution of 1:4 or 1:5 for heavy mud. I recall applying a thick layer of foam on my SUV after a particularly muddy trail run; it enveloped every nook and cranny, much like a protective blanket. Proper dilution ensures the foam cling to the surface, encapsulating dirt without wasting product or risking runoff contamination.
Start from the roof and work downward, overlapping your passes like you’re painting a wall. This systematic approach prevents missed spots and ensures even coverage. Use a foam cannon equipped with an adjustable nozzle, such as the microfiber towels for drying, to evaluate foam thickness in different areas. Think of it as applying a layer of asphalt—uniform coverage is crucial for effective dirt encapsulation and safer rinsing.
Let the foam sit on the surface for 5–10 minutes, but do not let it dry completely—think of it as letting bread rise, but watch for crust formation. During this waiting period, avoid any contact; movement can break the foam’s protective layer. I once applied foam too thick on a windy day, which caused clumping and uneven coverage—lesson learned: patience and timing matter.
Use a high-pressure rinse, starting from the top and working down—a process similar to rinsing sugar syrup from a cake to prevent mess and streaks. Attach a spot-free rinse filter, like those reviewed in mobile detailing water filters, to prevent water spots, especially on sensitive paints. Maintain a consistent, wide spray pattern to remove loosened dirt without forcing particles into your paintwork—think of it as gentle washing versus aggressive scrubbing.
After rinsing, inspect the vehicle, especially around wheel wells and lower panels. If stubborn mud persists, repeat the foam application, focusing on those trouble spots. For very stubborn deposits, consider using specialized wheel cleaners or clay bars, but always use them after a proper pre-wash to avoid scratching. Remember, working in stages prevents overload and ensures each step is effective.
Practicing this sequence regularly boosts your confidence. Over time, you’ll learn how long the foam needs to dwell on different surfaces and how much pressure to use when rinsing. For further insights into maintaining your vehicle’s finish after mud removal, visit how to maintain satin paint finishes for tailored tips that preserve your work. Mastering these core steps turns heavy mud challenges into simple routines—saving time, protecting paint, and achieving a professional shine every time.When it comes to DIY car detailing, there’s a widespread misconception that more aggressive products or the latest gadgets automatically guarantee a perfect finish. However, experienced detailers know that the devil is in the details—literally. A common mistake is assuming that generic auto detailing products or the cheapest car wash soap can deliver professional results. This overlooks the importance of understanding the nuanced chemistry and tailored application methods required for different paint types and conditions. For example, many believe that high-foaming car wash products are always better, but in reality, excessive foam can trap dirt if not used correctly, risking scratches. It’s critical to select products suited to your vehicle’s specific needs, which is where knowledge about paint correction and proper paint protection techniques comes into play.
Are You Using the Right Tools for Advanced Results?
Many DIY enthusiasts underestimate the importance of high-quality detailing supplies near me or the nuanced differences between various polishing pads and compounds. For paint correction, choosing the wrong pad or abrasive can cause micro-marring or fail to remove swirl marks effectively, leading to wasted effort and potential damage. Industry experts emphasize that understanding the abrasiveness level of your compounds and pads, like those reviewed at paint correction pads for 2026, is crucial for achieving a professional-level finish. Additionally, many overestimate the effectiveness of simple spray waxes, neglecting the benefits of advanced ceramic coatings for longer-lasting protection. Applying paint protection improperly can lead to adhesion failure, wasting both time and resources. Recent studies from leading automotive chemistry labs highlight that proper surface preparation and understanding the interaction of different products with substrate materials are vital for durability and shine. Take the time to educate yourself beyond beginner guides and consider investing in professional-grade tools and products suited for your vehicle’s specific finish. Before diving into complex procedures, ensure your equipment is up to par—check out maintaining satin paint finishes for tailored maintenance tips. Remember, true mastery of auto detailing rests on attention to these hidden nuances, transforming your work from amateurish to professional. Have you ever fallen into this trap? Let me know in the comments.
Keep Your Equipment in Prime Condition
Investing in quality tools is only half the battle; getting them to perform consistently requires regular maintenance. Personally, I swear by using a dedicated spray bottle for cleaning detailing tools—this allows me to quickly remove grease and residue from brushes and pads, ensuring optimal performance. For example, after each use, I rinse microfiber towels thoroughly with a specialized laundry detergent designed to remove embedded detailing products, which prolongs their softness and effectiveness.
When it comes to polishes, I prefer a dual-action polisher like the Griot’s Garage 6″ Random Orbital Polisher. It delivers a consistent finish without risking damage when used properly. To maintain its operation, I regularly check the backing plate for wear and lubricate the spindle as recommended in the manufacturer’s manual. Keeping your tools in excellent shape not only extends their lifespan but also guarantees streak-free, professional-grade results.
Choosing the Right Products for Longevity
For long-term protection, I rely heavily on advanced coatings like nanoceramics, which can last for years if applied correctly. When applying ceramic coatings, I use a quality applicator pad and follow precise surface prep routines, referenceable in this detailed guide. Proper maintenance of these coatings involves gentle washing with pH-neutral shampoos and periodic inspections to catch any signs of wear early. Recently, I integrated a high-volume water filter system to maintain spot-free rinsing, significantly reducing the need for re-polishing and touch-ups—making durability a practical reality.
Forecasting Trends in Car Detailing Equipment
Looking ahead, I predict the rise of smart detailing tools that connect via Bluetooth to provide real-time data on product usage and tool condition. These innovations will streamline maintenance routines and improve results, especially for professional shops. To stay ahead, I recommend adopting a few high-grade microfiber towels like those from this collection, which are designed to reduce marring during polishing and drying.
How do I maintain my detailing arsenal over time?
Regularly inspecting your equipment and replacing consumables before they wear out prevents unforeseen issues during a project. Implementing routine cleanliness—such as wiping down polishers and brushes after each use—keeps your tools performing at the highest level. Consider scheduling periodic professional tune-ups for key tools, similar to how automotive systems are serviced; it ensures longevity and consistent performance.
If you’re serious about elevating your car care routine, I recommend trying out a dual-action polisher paired with quality pads like these recommended pads. Combining the right tool with regular maintenance makes a real difference in achieving that flawless, mirror-like finish.
Lessons That Only Experience Can Teach in DIY Car Detailing
The critical mistake I made early on was overlooking the importance of waiting for foam to work its magic. I used to rush the rinsing process, thinking more pressure meant cleaner results, but I often ended up embedding dirt deeper or scratching the paint. Patience and timing truly are virtues in detailing, especially when heavy mud is involved.
Another lesson boiled down to tool selection. Purchasing cheap, generic brushes and microfiber towels may save money initially, but they often fail when faced with stubborn grime or delicate finishes. Investing in high-quality, tailored tools, like the detailed microfiber towels or precision clay bars, can make a remarkable difference in your outcomes and the longevity of your gear.
Lastly, I underestimated how critical proper surface preparation is before applying paint protection like ceramic coatings. Without a spotless, smooth surface, the protection layers won’t adhere properly, leading to premature degradation. Regularly referencing guides such as maintaining satin paint finishes keeps me focused and ensures my work is durable and professional.
Tools and Resources That Elevated My Detailing Game
Over the years, I found that using dedicated water tanks designed for mobile detailing and high-quality wheel cleaners help maintain efficiency and minimize cross-contamination. For paint correction, specialized correction pads enable me to achieve that mirror-like finish without going overboard or causing damage.
To keep my tools in top shape, I routinely clean and inspect them, leveraging resources like detailed guides on ceramic coating maintenance and car wash supplies. These investments in knowledge and equipment, combined with a genuine passion, have been my keys to professional results at home.
Your Next Step Toward Detailing Confidence
There’s a learning curve in mastering heavy mud removal that can seem steep at first, but every successful wash boosts your confidence and skill. Remember, the true mastery of auto detailing is about attention to detail, patience, and continual learning. If you’re ready to elevate your car care, explore the tailored supplies and expert tips we’ve discussed—your vehicle deserves it, and your satisfaction will follow.
What has been your biggest challenge when dealing with stubborn mud or paintwork? Share your experiences below and join the community of passionate DIY detailers committed to excellence!
About the Author
Timothy Carr
Tactical Vehicle Training, Sales Support, and Parts ...
Timothy Carr is a seasoned professional with a diverse background in tactical vehicle training, parts management, and safety branding. Having managed critical aspects of branding and safety programs for the United States Army in Kuwait, Timothy brings a unique, high-stakes perspective to the world of vehicle maintenance and care. His extensive experience in tactical vehicle operations and sales support provides him with a deep understanding of the technical requirements and high-performance standards necessary for maintaining vehicles in demanding environments. At cardetailingservicesupplies.com, Timothy leverages his expertise in vehicle parts and safety protocols to provide authoritative insights into the best practices for car detailing and supply management. His professional history in designing safety programs and managing complex vehicle logistics ensures that his advice is both practical and grounded in rigorous standards. Timothy is dedicated to translating his high-level technical knowledge into accessible, actionable advice for car enthusiasts and professional detailers alike. He is passionate about helping others achieve excellence in vehicle maintenance and ensuring that every car receives the professional care it deserves to perform at its best.
LinkedIn Profile