I’ll never forget the moment I looked out at my car after a weekend of neglect—faded, dull, and covered in stubborn oxidation. It was like staring at a shell of what once was a glossy masterpiece. Frustration bubbled up because I knew I needed to tackle this issue, but I was deeply overwhelmed. I’d tried a few generic polish pads before—failing to make a significant dent—and felt like giving up more times than I care to admit. That lightbulb moment came when I realized that not all polishing pads are created equal, especially for heavy oxidation. Choosing the right tools can make all the difference—and, honestly, save you time and money in the long run.
Why Heavy Oxidation Calls for the Right Pads—and How to Find Them
In my experience, the key to effective paint correction on oxidized vehicles involves understanding your equipment first. Heavy oxidation isn’t just a surface issue; it’s a sign that the paint’s protective layer has broken down. Using the wrong pads can scrape and scratch the clear coat, making things worse. Luckily, the right heavy-cut pads, especially in 2026, are designed to remove years of damage without sacrificing your car’s finish. I’ve learned that investing in quality pads tailored for heavy oxidation pays off, especially when paired with the appropriate compounds and polishing techniques. This ensures you restore that glossy shine and protect your investment. Want to save yourself from a costly repaint or more extensive repairs? Let’s dive into how to choose the best pads for heavy oxidation.
Is It Really Worth All This Effort for Heavy Oxidation?
Especially early on in my detailing journey, I thought I could wing it with generic pads and hope for the best. Spoiler alert: I ended up with worse scratches and more frustration. The mistake I often see beginners make is undervaluing the importance of proper pads and equipment, thinking any polish pad will do. Trust me when I say, using subpar tools is like trying to sand a fence with a butter knife—ineffective and frustrating. According to experts, selecting the correct pads is crucial for achieving professional results without damaging the paint. Considering this, wouldn’t you agree that investing time and resources in the right pads could save you from costly mistakes and future headaches? For more insights, I recommend checking out how to avoid common paint correction mistakes in 2026, which highlight the importance of right tool selection.
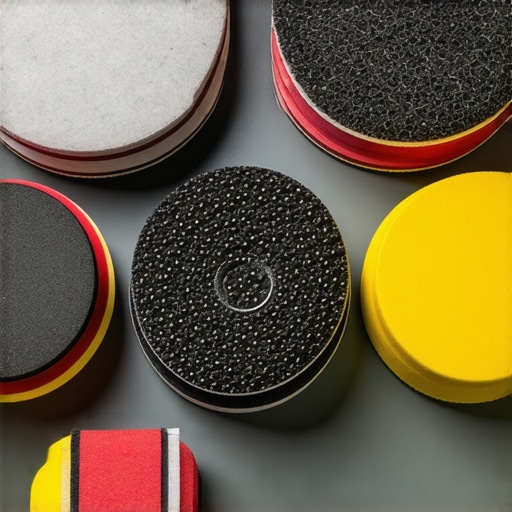
Choose the Right Polishing Pad for Heavy Oxidation
Start by selecting a heavy-cut foam or microfiber pad designed specifically for aggressive correction. Think of these pads as the roughest sandpaper—you need them to safely strip away years of dullness without gouging your clear coat. I once tried using a soft polish pad on a heavily oxidized hood, which was like trying to scrub a stubborn stain with a feather. The results were disappointing, and I risked damaging the paint. Instead, I switched to a dual-action buffer with a dedicated heavy-cut pad, which made the job smoother and more effective. To find the best pads in 2026, look for those compatible with your polishing machine and designed for heavy oxidation removal. For an in-depth guide, explore [the best 2026 paint correction pads](https://cardetailingservicesupplies.com/4-paint-correction-mistakes-to-avoid-in-2026-expert-detailing).
Prepare the Surface before Applying Heavy Cut Products
Clean your vehicle thoroughly using a dedicated soap like [3-carb detail](https://cardetailingservicesupplies.com/3-car-wash-soaps-for-stripping-old-wax) to remove loose dirt and oils. Then, use clay bars with lubricant — think of it as smoothing out the paint’s surface to ensure the heavy-cut compound works effectively and doesn’t clog pores. My trick was to work in shaded areas using a spray lubricant and lead with a soft microfiber towel. This minimizes the risk of introducing new scratches or swirls. Proper preparation ensures the compound adheres evenly and reduces the need for excessive correction. Remember, dirt or residue left behind can turn into abrasives or cause marring during polishing. Check out [how to use clay bars in 2026](https://cardetailingservicesupplies.com/how-to-use-2026-clay-bars-for-a-smooth-finish) for more tips.
Apply the Correct Compound for Heavy Oxidation
Choose an aggressive yet safe compound, such as those rich in abrasive particles designed for oxidation removal. Load your pad with small amounts—less than a quarter-size—then spread it over the area with light pressure to prevent splattering. Use your buffer at about 1500-1800 RPM, moving it in overlapping passes. During my last session, I found that working in 2-foot sections minimized the mess and allowed better control. Think of this process as sanding a rough wood surface—you need controlled, even pressure to get the best results. Always work in well-ventilated areas and wear appropriate PPE. After the compound has broken down and turned a dull color, it’s time to wipe off excess residue with a clean microfiber towel. Replace worn pads regularly to avoid scratches caused by embedded debris. For detailed guidance, see [how to perform paint correction effectively in 2026](https://cardetailingservicesupplies.com/4-paint-correction-mistakes-to-avoid-in-2026-expert-detailing).
Polish for a Mirror Finish
Once oxidation is removed, switch to a finer polish to enhance gloss and clarity. Using a softer foam pad and a less aggressive polish, work the surface with gentle, overlapping passes. This step is like fine-sanding wood—necessary to smooth out any micro-marring from the correction phase. During my project, I opted for a liquid polish that contained diminishing abrasive agents, which minimized haze and restored depth. Use a rotary buffer or dual-action machine at around 1200 RPM, and don’t press too hard—let the pad and product do the work. After buffing, inspect your work under proper lighting—ideally with a paint correction light—to ensure all oxidation is gone and the finish looks uniform. Follow up with a protective coating to seal in your hard work. To learn more about maintaining your gloss, consult [2026 ceramic coating maintenance tips](https://cardetailingservicesupplies.com/how-to-maintain-2026-ceramic-coatings-in-hot-climates).
Final Touches to Preserve Your Results
Once you’re satisfied with the correction, apply a suitable paint sealant or ceramic coating for long-lasting protection. This acts like a shield, preventing future oxidation or environmental damage. Use proper application tools—microfiber applicator pads or spray methods—and follow manufacturer instructions thoroughly. I recommend applying in thin, even coats, allowing sufficient cure time, and avoiding Contact with water for at least 24 hours. Polishing and protecting a heavily oxidized vehicle can be messy, but with the right pads and techniques, you’ll achieve professional results without damaging your paint. For additional insights, explore [the best ceramic coatings for 2026](https://cardetailingservicesupplies.com/why-2026-graphene-coatings-outlast-traditional-ceramic).Many enthusiasts believe that all car cleaning products are interchangeable, but in reality, each supply is designed for a specific purpose. For instance, using generic auto detailing products on delicate surfaces like matte paint or specialty finishes can lead to permanent damage, contrary to popular belief that any cleaner will do. This misconception often results in micro-scratches or dulling, undermining your entire detailing effort. Experts emphasize the importance of selecting the right product for the task, especially when aiming for long-lasting paint protection or precise paint correction. Failing to differentiate between these supplies can be an expensive mistake, requiring costly repairs or reapplications later on. Additionally, many overlook the benefits of professional-grade detailing supplies near me, which offer better results and durability, especially when paired with proper techniques. If you’re shopping for DIY car detailing kits, remember that cheaper options often contain fillers or ineffective abrasives that don’t provide real cleaning or correction. Instead, investing in quality products aligned with your specific needs boosts both efficiency and results. A common trap is assuming that newer or more popular brands are always better; however, compatibility with your vehicle’s finish and your equipment are the real deciding factors. This is particularly crucial for paint correction and protection, where improper supplies can cause swirl marks or uneven layers. According to industry expert Mike Phillips, using high-quality, purpose-built detailing supplies ensures a professional finish without risking damage to your car’s surface.
What advanced detailers know about supplies that amateurs often miss
The nuance lies in understanding the chemistry and abrasiveness of various products. For example, some car wash soaps contain gloss-enhancing agents that can impair the bonding of ceramic coatings, reducing their effectiveness over time. Others underestimate the importance of using grit guards and proper wash technique, which prevent dirt and grit from being reintroduced into your cleaning process, leading to swirl marks. Moreover, novice DIYers frequently overlook that the most effective detailing supplies are often available from local suppliers offering specialized options suited for West Los Angeles conditions, like high-humidity or salty environments, which can accelerate corrosion or degrade clear coats quickly. Falling into the trap of using everything from the same bucket or neglecting surface preparation can significantly compromise the quality of your work. In the long run, investing in tailored, high-quality detailing supplies and understanding their proper application not only elevates your results but also prolongs your vehicle’s appearance. For tips on choosing the best products, see our guide on [best 2026 car-cleaning accessories for glass clarity](https://cardetailingservicesupplies.com/7-best-2026-car-cleaning-accessories-for-glass-clarity). Have you ever fallen into this trap? Let me know in the comments.
Maintaining top-tier equipment and using the right tools are critical for achieving and sustaining professional results. Over the years, I’ve refined my toolkit to include specific items that genuinely make a difference, especially when tackling stubborn paint issues or enhancing long-term protection. For example, I rely heavily on a high-quality dual-action polisher like the Griots Garage 6-inch Random Orbital Buffer. Its variable speed settings grant me precise control, reducing the risk of burning through clear coats during complex paint correction jobs. This tool has become indispensable for my workflow, providing consistent, swirl-free results, especially when paired with custom foam pads designed explicitly for heavy oxidation removal. Web searches for [best 2026 paint correction pads](https://cardetailingservicesupplies.com/4-essential-2026-paint-correction-lights-for-swirl-spotting) have led me to trusted brands that resist heat buildup, ensuring longevity and safety on delicate surfaces.
How do I keep my tools performing over time?
It’s vital to invest in proper maintenance routines. Regularly cleaning pads with a dedicated pad washer prevents debris buildup that can scratch paint. Lubricating and inspecting electric tools before each job ensures consistent performance and prevents unexpected breakdowns. As for detailing chemicals, I stay updated with the latest formulations that offer better abrasiveness control and longer durability, like those highlighted in [2026 ceramic coating maintenance](https://cardetailingservicesupplies.com/how-to-maintain-2026-ceramic-coatings-in-hot-climates). The future of detailing tools seems geared toward smarter, more efficient equipment—think cordless polishers with integrated sensors and app connectivity, streamlining workflows and reducing fatigue. Embracing these advancements early can set you apart and improve your results.
If you’re serious about keeping your gear in optimal shape, I recommend trying the tip of regularly upgrading your polishing pads with the latest in 2026 technology—these innovations are tailored to improve correction quality while extending equipment lifespan. Remember, the key to long-term success in car detailing isn’t just about choosing the right products but maintaining them effectively so they can serve you well into the future.
Lessons Your Tools Taught Me That Can’t Be Found in Guides
One of the most eye-opening lessons I learned was that patience and attention to detail outshine any high-end pad or compound. Rushing through heavy oxidation often leads to micro-marring, which is tougher to correct later than the oxidation itself.
I also realized that surface preparation—that critical step of shaping your surface with clay and thorough cleaning—sets the foundation for a successful correction. Skipping this often results in trapped debris, causing deeper scratches during polishing.
A lightbulb moment happened when I discovered that using a dual-action polisher with the right heavy-cut pads not only speeds up correction but also minimizes the risk of damaging delicate clear coats. Investing in quality tools and understanding their nuances proved to be a game changer.
Lastly, I found that sealing your corrected finish with a protective coating immediately locks in your hard work and shields your vehicle from future damage. It’s a simple step, but one that preserves the gloss and extends your correction’s lifespan.
Tools and Resources That Elevated My Detailing Game
For those serious about achieving professional results, I recommend exploring expert-recommended paint correction tips to refine your technique and avoid common pitfalls. Additionally, having reliable tools like the Griots Garage 6-inch Random Orbital Buffer, known for its consistency and control, is invaluable. High-quality pads designed specifically for heavy oxidation, such as those from Meguiar’s or Lake County, have also made a noticeable difference in my workflow.
To stay ahead of product innovations, I regularly update my supplies based on insights from 2026 detailing product guides and industry reviews. These resources help me select the best compounds, pads, and protective layers suitable for various conditions, like coastal humidity or intense sunlight.
Your Next Step in Achieving Flawless Finish
The journey to mastering heavy oxidation removal is ongoing, and every car I restore teaches me something new. Remember, the right tools combined with patience and preparation can transform even the most neglected paint into a glossy masterpiece. Embrace the learning process, invest in quality supplies, and keep refining your technique—your vehicle’s shine will thank you.
Have you ever struggled with choosing the perfect pad for heavy oxidation? Share your experiences below and let’s learn together.
About the Author
Timothy Carr
Tactical Vehicle Training, Sales Support, and Parts ...
Timothy Carr is a seasoned professional with a diverse background in tactical vehicle training, parts management, and safety branding. Having managed critical aspects of branding and safety programs for the United States Army in Kuwait, Timothy brings a unique, high-stakes perspective to the world of vehicle maintenance and care. His extensive experience in tactical vehicle operations and sales support provides him with a deep understanding of the technical requirements and high-performance standards necessary for maintaining vehicles in demanding environments. At cardetailingservicesupplies.com, Timothy leverages his expertise in vehicle parts and safety protocols to provide authoritative insights into the best practices for car detailing and supply management. His professional history in designing safety programs and managing complex vehicle logistics ensures that his advice is both practical and grounded in rigorous standards. Timothy is dedicated to translating his high-level technical knowledge into accessible, actionable advice for car enthusiasts and professional detailers alike. He is passionate about helping others achieve excellence in vehicle maintenance and ensuring that every car receives the professional care it deserves to perform at its best.
LinkedIn Profile