I remember the first time I tried tackling a high-gloss paint job in my driveway, sweating under the sun, with just a handful of overhyped products and too much optimism. The clear coat was soft, and every small mistake seemed to send me back to square one. It was a lightbulb moment—how could something so seemingly straightforward, like achieving that perfect mirror finish, turn into such a frustrating puzzle?
Moving into 2026, the standards for automotive paint correction have skyrocketed. Car enthusiasts and professional detailers alike are now chasing that high-performance, flawless mirror shine—something that lasts and truly turns heads. But here’s the thing: with the rise of complex metallic and multi-layer paints, the old methods just don’t cut it anymore. DIYers, especially, often find themselves stuck, wasting time and products without seeing real results.
Today, I want to walk you through the core principles and techniques that will elevate your paint correction game for this new era. I’ll share insights from personal experience and the latest industry practices, so you’re not left behind in the dust.
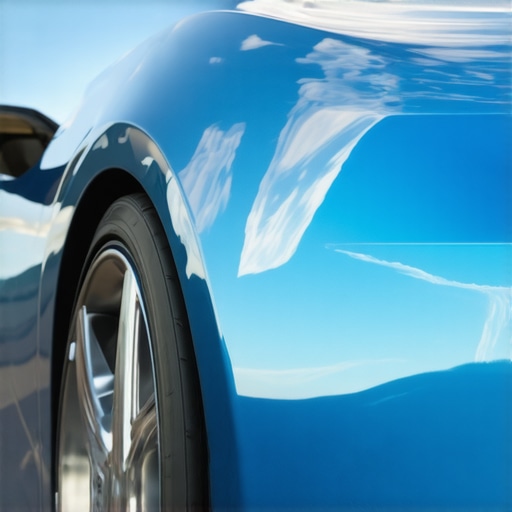
Why Achieving a Perfect Mirror Finish Matters More Than Ever
In recent years, automotive finishes have become more intricate, requiring a precise approach to restore their depth and clarity. The high-performance paints of 2026 are engineered to impress, but they can be quite unforgiving if not handled with the right care and knowledge. A mirror finish isn’t just about looks; it reflects your dedication to quality and attention to detail. Plus, a well-corrected paint job can significantly boost your vehicle’s resale value and protect it against environmental damage.
However, many enthusiasts underestimate the importance of understanding the nuances of modern paint technology. For instance, metallic and pearlescent paints demand different correction techniques compared to single-stage finishes. If you skip the correct process, you’ll end up with micro-marring or uneven gloss. Trust me, early on, I made the mistake of rushing through a correction on a high-end metallic, only to realize that I had actually worsened the very issue I was trying to fix.
A key resource I found invaluable was the detailed step-by-step guide on [paint correction for 2026 metal finishes](https://cardetailingservicesupplies.com/paint-correction-for-2026-metallic-finishes-step-by-step), which offers practical advice tailored to new paint formulations. If you’re serious about mastering this craft, investing time in understanding these specific techniques is essential.
Have you faced struggles in getting that flawless mirror shine on your vehicle? Perhaps you’ve experienced uneven gloss or micro scratches that just won’t go away? If so, you’re not alone—and the good news is, with the right approach, you can overcome these hurdles.
As we move forward, I’ll share the practical steps and tools you need to turn your paint correction sessions into a success, setting the stage for stunning results that match or even surpass professional standards.
Prep Your Tools and Environment
Start by gathering your essential equipment: a dual-action polisher, quality foam or microfiber pads, cutting and polishing compounds, and appropriate LED lighting to see every detail. Think of your buffer as your paint’s surgeon—precision matters. Set up in a dust-free, well-lit area to prevent contaminants from spoiling your work. On a personal note, I once tried correcting paint in a dusty garage, only to find micro-marring after finishing. Now, I always ensure a clean, controlled environment, which drastically improves results.
Choose the Right Products
For 2026’s complex paints, select products designed for high-performance finishes. A medium-cut compound paired with a fine polish will remove micro-marring without sacrificing gloss. For metallic or pearl paints, use special lubricants to prevent staining or mottling. A good rule of thumb: less is more—avoid overusing products, which can cause swirl marks. I learned this the hard way when applying too much compound, leading to cloudy patches that took hours to correct.
Proper Surface Preparation
Clean the vehicle thoroughly using a pH-balanced car wash soap like the best 2026 car wash supplies for high-gloss black paint. Rinse thoroughly to remove dirt and debris that can cause micro scratches during correction. Use clay bar or a paint decontamination system to strip embedded contaminants—think of it as sanding the surface to make correction easier. Once, I skipped this step and ended up chasing micro-marring all day; now, it’s the first step I don’t skip.
Test a Small Area First
Applying correction products on a small, inconspicuous patch lets you gauge pad pressure, product load, and machine speed. For example, I once tested a tiny section on my car’s door, slowly ramped up the polish speed, and watched for the change in gloss. This way, you avoid overcorrecting or burning through the clear coat. Remember, too much pressure can cause clear-coat burn, especially on those soft 2026 finishes—gentle, consistent movement is key.
Application Technique and Movement
Imagine your polisher as a paintbrush; steady, overlapping passes are essential. Keep the pad in contact with the surface with light to moderate pressure—like a gentle massage. Use a crossing pattern—side to side, then up and down—to ensure even correction. During my own work, I found that maintaining a speed of around 4-5 on the polisher helped distribute the product evenly for a smooth finish. Keep moving the buffer—staying in one spot too long risks burning through the paint.
Work in Zones and Breaks
Divide your car into sections—hood, fenders, doors—and focus on one at a time. After completing each zone, inspect under different angles and lighting. I recall finishing a fender, then stepping back and noticing missed spots due to uneven gloss; more attention here saved hours of rework later. Use a flashlight or a dedicated detailing lamp to reveal micro-marring or holograms, which are common pitfalls if the correction isn’t thorough.
Post-Caint Finish Inspection
After polishing, wipe the surface with a clean microfiber towel to remove residues. Inspect under natural light—here’s a pro tip: use a step ladder or stand close to the vehicle for the best angle. You want a mirror-like finish with no swirl marks or holograms. If imperfections remain, repeat the correction process on those areas, adjusting your pad or compound as needed. Remember, patience here results in that stunning, sky-reflective shine that makes your effort worthwhile.
Follow with a Protective Layer
Applying a ceramic coating or high-quality wax seals and protects your work. For 2026’s finishes, I recommend a ceramic spray like the why 2026 ceramic coating sprays beat old-school wax. It enhances gloss, adds durability, and simplifies future maintenance. During my last correction, a light coating turned the glossy paint into a mirror-perfect surface with minimal upkeep, saving me hours in the long run.
Maintain and Monitor
Regular washes with rim and paint-safe soaps, avoiding harsh chemicals, prevent micro-marring from reoccurring. Use soft microfiber wash mitts and high-pressure rinses from top 2026 car wash supplies for high-pressure detail performance to extend your correction’s life. Consistent maintenance ensures your mirror finish stays stunning over months and years, not just days.
In the world of auto detailing, there’s a common misconception that more expensive or specialized equipment automatically guarantees better results. However, in my experience, many enthusiasts overlook the importance of understanding the subtleties behind equipment choices, especially when it comes to advanced paint correction and ceramic coating processes. For instance, DIY car detailing kits often include generic products that seem appealing but can hinder the quality of your finish—particularly on complex 2026 paint formulations.
Is Bigger Always Better When Selecting Detailing Tools?
One trap I see frequently is the assumption that larger or more powerful equipment leads to superior results. While higher wattage or larger buffers might seem advantageous, they can actually cause more harm than good if not used properly. Oversized polishers or overly aggressive compounds can burn through soft clear coats, especially on newer, high-performance finishes, leading to costly reworks. Instead, selecting the right tools—such as dual-action polishers with variable speed settings—and understanding their proper application, as detailed in this guide on paint correction for 2026 finishes, is crucial for achieving optimal results.
Another overlooked aspect is product compatibility and application technique. Many DIYers rely on generic wash soaps or quick-detailers, not realizing that these products may contain ingredients detrimental to ceramic coatings or high-gloss paints. For instance, using harsh chemical cleaners on coated surfaces can degrade the protection layer over time. Instead, investing in specialized products like those found in top-rated car wash supplies for high-gloss black paint can extend the lifespan and enhance the appearance of your investment.
Let’s also discuss the misconception that more product equals better performance. Applying excess ceramic coating or polishing compound doesn’t speed up the process and can actually lead to streaks, holograms, or micro marring. Less is more—think of it as a fine art rather than a paint-by-numbers approach. Mastering the correct amount and technique, as explained in this advanced tutorial, is paramount for advanced users aiming for a showroom shine.
What about the external factors that amateurs often ignore?
Environmental conditions during detailing are often underestimated. Dust, humidity, and temperature fluctuations can significantly impact the outcome of your paint correction or ceramic coating application. For example, performing a job in a dusty garage or a humid environment can introduce micro-contaminants, resulting in micro-marring or curing issues. Always choose a controlled, clean space, and consider upgrading your setup with portable HEPA filtration units—details on which can be found in this comprehensive guide.
Finally, I want to address a broader misconception regarding auto detailing products: the myth that cheaper alternatives are equally effective. While affordability is essential, cutting corners on quality can backfire, especially on complex 2026 paint systems that demand precision. High-grade products not only ensure better results but also preserve your vehicle’s finish over time, making them a smart investment. Remember, in detailing, the devil is in the details, and subtle nuances often make the difference between a mediocre job and a professional-level shine.
Have you ever fallen into this trap? Let me know in the comments. Mastering these hidden nuances will elevate your detailing game from basic upkeep to true craftsmanship.
Keep Your Gear Running Smoothly
Investing in high-quality equipment is just the first step; maintaining it ensures consistent, professional results over time. I personally swear by the Dewalt DWP849X orbital polisher. Its variable speed control and ergonomic design allow for precise correction on the newest, delicate 2026 metallic paints, reducing the risk of burn marks and holograms. Regularly inspecting pads for wear and cleaning spray nozzles on foam guns help prolong their lifespan and prevent clogging, which is crucial for that mirror finish everyone desires.
Choosing Reliable Tools for Long-Term Play
When selecting equipment—like a dual-action polisher or high-pressure foam cannon—consider not only performance but also the availability of replacement parts and warranty support. For example, I opt for professional-grade high-pressure foam guns because they handle the increased demand of multiple vehicles weekly, especially with complex 2026 paint systems. These tools save you time and money in the long run and ensure your results stay consistent.
Anticipate Future Trends in Detailing Equipment
As technology advances, I predict cordless, smart-enabled polishers and sprayers will dominate the scene—offering more control and real-time diagnostics to fine-tune your process. Keeping your setup updated with the latest in auto detailing tools—like the upcoming models with integrated temperature sensors—will position you ahead of the curve, especially for high-end shop environments or serious DIY enthusiasts aiming for perfection.
How do I maintain my equipment over time?
Maintaining your gear involves routine cleaning, proper storage in climate-controlled environments, and periodic replacement of consumables. For example, always rinse out spray nozzles thoroughly after use and store polishers in dust-free cabinets. I recommend a quick backup for your tools—like adding a spare pad or two—so you’re never caught off guard during a critical correction session. Avoiding equipment downtime is key to upholding consistently pristine finishes, especially when working with reactive 2026 paints that demand precision.
Remember, equipment maintenance isn’t just about prolonging lifespan but also about safeguarding the quality of your work. Micro-marring caused by worn pads or clogged nozzles can undo hours of careful correction. To get expert insights and detailed routines on proper gear upkeep, check out the comprehensive tips in this resource. Try implementing a dedicated maintenance schedule today, and you’ll notice an immediate boost in your results and efficiency.While the journey through 2026’s high-gloss paints has been filled with technical challenges and moments of revelation, it’s important to remember that true mastery stems from embracing lessons learned along the way. One of the hardest truths I uncovered is that no matter how advanced your equipment or products are, understanding the subtle nuances of each paint formulation makes all the difference. For instance, I once assumed that increasing polish speed would speed up results, only to cause holograms and burn marks—an essential reminder that patience and finesse trump brute force. Additionally, relying solely on tools without mastering proper technique can be costly; I found that even the most expensive buffer can’t rescue a poorly executed correction. Recognizing that each vehicle’s paint responds differently has pushed me to customize my approach, relying on rigorous testing and inspection, rather than a one-size-fits-all mentality. Lastly, the realization that consistent maintenance, including proper DIY care with the right car wash supplies, preserves the mirror finish longer, transformed my routine from reactive to proactive. These lessons have shaped my approach to auto detailing into a craft that blends technical precision with an intuitive feel, elevating every project from good to exceptional.