I remember the moment vividly: I was in my garage, trying to clean those tiny, glitchy haptic buttons on my new electric vehicle. Frustration was mounting because no matter how gently I dabbed or sprayed, I worried about damaging the delicate sensors hidden beneath. It felt like walking a tightrope—one wrong move and I’d risk expensive repairs. That lightbulb moment hit me hard—there had to be a safer way.
Why Cleaning Your Haptic Buttons Safely Matters More Than Ever
Modern vehicles are packed with high-tech features, and those 2026 Haptic Buttons are no exception. They offer sleek design and intuitive control, but they also come with a catch: their tiny sensors are incredibly fragile. If you’ve ever tried to clean these buttons with rough cloths or harsh chemicals, you might have experienced misfires or, worse, permanent damage. That’s why understanding how to properly clean and maintain them is essential—not just for appearance but for lasting functionality.
Are You Risking Sensor Damage with Your Current Methods?
Early on, I made the mistake of using aggressive cleaning sprays and scrubbing too hard. It seemed effective at first, but soon I noticed inconsistent responses from my buttons. Scratches and sticky residue were signs I’d pushed my luck. This experience taught me a vital lesson: improper cleaning can compromise the sensor’s integrity, leading to costly repairs. To avoid this, I turned to expert advice and tested different techniques, gradually discovering a method that’s both effective and safe. If you’re curious about how professionals approach this, check out their recommendations on [mobile detailing supplies](https://cardetailingservicesupplies.com/4-mobile-detailing-van-organizers-for-2026-expert-detailing) and see how they handle sensitive components with care.
The key takeaway? Preserving your vehicle’s tech starts with gentle, informed cleaning practices. Now, let’s explore those proven methods that keep your haptic buttons pristine without risking damage. Are you ready to protect your investment while keeping everything looking and functioning perfectly? Let’s dive in.
Gather Your Tools Before You Start
First, assemble gentle cleaning supplies: opt for microfibre cloths, pH-balanced car wash soap, and soft brushes. Avoid harsh chemicals or abrasive materials that could scratch or damage sensors. Think of this as preparing a delicate skincare regimen—using the right products matters immensely.
Prep the Vehicle and Work Area
Park your EV in a shaded spot to prevent quick evaporation of cleaning solutions and ensure you have good lighting. Use a portable LED detailing light (like those found at local detailing supplies) to see tiny dust or residue around the buttons. Clear the surrounding area of debris to avoid accidental scratches during cleaning.
Initial Dust Removal
Start with a dry microfibre cloth to gently wipe the surface of the haptic buttons, removing loose dust and dirt—think of it as brushing off makeup before cleaning your face. If stubborn grime remains, use a soft detailing brush to loosen debris from crevices, mimicking a painter’s brush working into fine corners.
Enacting a Safe Cleaning Solution
Mix a small amount of pH-neutral car wash soap into water—like creating a gentle facial cleanser. Dampen your microfibre cloth in this solution, wringing out excess liquid thoroughly. The goal is moist, not dripping, to prevent liquid seepage into sensitive components. This is similar to using a damp cloth to clean delicate electronics—careful and controlled.
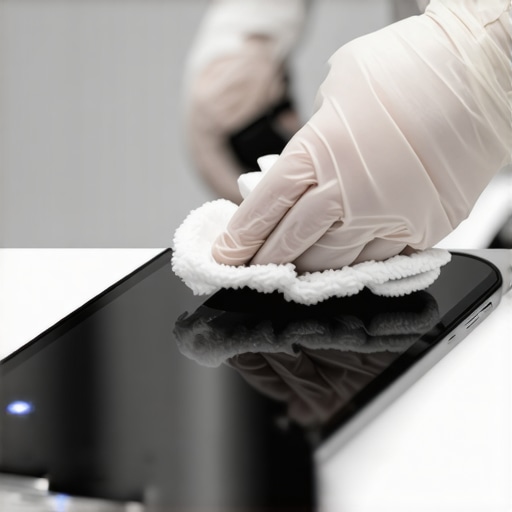
Light Wiping Technique
Gently wipe over the buttons, making circular motions without applying pressure. This prevents scratching and minimizes sensor stress. I remember a time I used a sawing motion and felt the resistance—they weren’t happy! Instead, keep your hand light, like petting a puppy—a delicate touch yields the best results.
Dabbing and Spot Cleaning
For tougher spots, use a cotton swab dipped in your soapy solution—think of it as spot treatment on problematic skin. Carefully clean around the edges of the haptic buttons, avoiding excess moisture. Pat dry immediately with a clean microfibre cloth to remove residual water, preventing water ingress that could damage electronics.
Final Inspection and Drying
After wiping, inspect the buttons under your LED light, checking for missed spots or streaks. If needed, repeat with a clean, slightly damp cloth. Finish with a dry microfibre cloth to buff the area, leaving a streak-free shine—like polishing glass for clarity. Remember, never use abrasive pads or aggressive scrubbing, which is comparable to scratching a painted surface.
Maintenance Tips to Keep Them Pristine
Regularly clean your haptic controls during routine washes to prevent dirt buildup. Use a soft detailing brush from mobile detailing supplies to reach tricky spots. If you notice sticky residues or response issues later, a light re-cleaning following these steps can restore proper function. Think of it as regular skincare—prevents big problems down the line.
 Many enthusiasts and DIYers assume that all car wash soaps and detailing supplies are created equal, but in reality, misconceptions about these products can lead to subpar results and even damage your vehicle’s finish. One common myth is that cheaper cleaning solutions or generic off-brand products perform just as well as premium auto detailing items. However, the reality is that high-quality products—such as specialized car wash soaps or advanced ceramic coatings—are formulated to be pH-balanced and gentle on your paint, preventing swirls and etching. Relying on improper products often results in micro-scratches, loss of gloss, and reduced paint protection, especially when using abrasive brushes or harsh chemicals. An important hidden nuance is that some auto detailing products contain fillers or unnecessary additives that don’t enhance cleaning but can clog surface pores or leave residues, making subsequent polishing or coating less effective. For instance, many assume that all microfibre towels are suitable for every task; but different microfiber types are designed for specific functions like drying or polishing, and mixing them up can diminish their effectiveness. Furthermore, many car owners overlook the significance of proper equipment calibration—such as foam cannons or pressure washers—since using high-pressure equipment with low-quality soap can strip off wax layers or damage the clear coat. As expert detailers emphasize, selecting the right products and understanding their chemistry makes a tangible difference. For example, choosing a high-end [car wash soap](https://cardetailingservicesupplies.com/is-your-2026-car-wash-soap-ph-balanced-why-it-matters) tailored for your vehicle’s material ensures optimal cleaning without stripping protective layers. When it comes to paint protection, DIY ceramic coatings have gained popularity, but improper preparation or application can lead to uneven coverage or high spots, compromising long-term durability—so always follow manufacturer guidelines or consult professional-grade supplies like those found in West Los Angeles detailing stores. A recurring pitfall is relying solely on generic detailing kits that promise quick results but lack advanced formulations necessary for high-end finishes. Instead, investing in quality [auto detailing products](https://cardetailingservicesupplies.com/why-2026-ceramic-coatings-beat-traditional-paste-wax) tailored to your car’s paint type can save time and money, offering superior protection. Make sure to educate yourself on the subtle differences in formulations and usage techniques; this can prevent costly mistakes and elevate your DIY projects from average to expert level.
How do you ensure you’re using the right products for your vehicle’s unique needs?
The key lies in understanding product chemistry, application methods, and your vehicle’s surface condition. Experts recommend testing new products on small inconspicuous areas first and avoiding shortcuts. Remember, even the best [DIY car detailing kits](https://cardetailingservicesupplies.com/3-diy-car-detailing-kits-for-2026-lease-returns) won’t compensate for poor product selection or technique. Have you ever fallen into this trap? Let me know in the comments.
Investing in the Right Equipment Ensures Longevity
When it comes to maintaining your vehicle’s pristine condition, choosing the right tools is paramount. Personally, I swear by high-quality foam cannons like those featured at our top picks for 2026. They produce dense, thick foam that clings effectively, allowing you to pre-soak and loosen dirt without scratching your paint. Using a 7-car wash supplies set from this curated collection has streamlined my process, saving time and ensuring consistent results during fleet washes or personal detailing sessions.
Balancing Power and Portability with Mobile Equipment
For on-the-go detailing, I rely on compact yet powerful mobile van organizers. They keep my tools organized and accessible, which is crucial during quick turnarounds. An air compressor is also essential for drying and applying coatings; I prefer models like the professional grade ones that balance noise level with airflow. These tools are vital for ensuring thorough, professional results every time.
Precision in Polishing and Paint Correction
Achieving a mirror finish requires more than just skill—it demands the right polish and applicators. I use specific paint correction polishes that match my vehicle’s paint type, ensuring effective swirl removal without introducing new scratches. Pairing these with high-quality polishing pads from top-tier manufacturers allows me to tackle even tight body lines with ease. Remember, just like with any delicate operation, the proper tools make all the difference in long-term results and paint durability.
How do I keep my tools performing over time?
Regular maintenance is key. Rinse and clean polishing pads after each use to prevent residue buildup, and store equipment in a dry, dust-free environment. Investing in durable hose reels and storage solutions prolongs the life of your equipment and keeps your workspace organized. To truly master your detailing craft, I recommend taking the time to calibrate and test your tools periodically, ensuring optimal performance. Experts also suggest keeping detailed logs of maintenance routines to track wear and replacements—an often-overlooked step that pays off over the long haul.
Predictions for the Future of Car Detailing Tools
Looking ahead, I believe automation and smart technology will revolutionize vehicle maintenance. Imagine integrating IoT-enabled sensors into your polishing or coating devices that alert you when maintenance is due—saving time and preventing equipment failure. Additionally, advancements in battery technology will make cordless tools more powerful and longer-lasting, streamlining mobile operations even further. Staying updated with these innovations will give DIY enthusiasts and professionals alike a competitive edge.
Make Your Car Shine Effortlessly — Try Using an Advanced Foam Cannon
If you haven’t already, experiment with a premium foam cannon. The dramatic difference in suds and cleaning efficiency is worth the investment, especially for those aiming for a mirror-like finish. Remember, the key to maintaining a professional look is not just the products but also the reliability of your tools. Properly maintained equipment ensures consistent results, saving you money and effort over time. Ready to elevate your detailing game? Give this tip a try and see the difference for yourself!
In my journey to perfect vehicle maintenance, I’ve uncovered a critical insight: even the smallest detail, like cleaning a haptic button, demands respect and finesse. The lessons I’ve learned show that the gap between effective cleaning and damage lies in choosing the right products and employing gentle methods. Using the correct auto detailing supplies, such as pH-balanced soaps and soft microfibre towels, has consistently prevented costly repairs and preserved the integrity of high-tech controls. Remember, patience and knowledge are your allies—rushing or guessing can undo years of careful investment. As the future of car detailing evolves with innovations like smarter tools and advanced coatings, embracing these principles ensures your ride remains flawless and protected for years to come. Stay curious, keep learning, and your vehicle will thank you for it.
This post provides some really insightful tips on cleaning those tiny, fragile haptic buttons, which can be surprisingly tricky. As someone who works with high-tech car interiors, I’ve found that using a dedicated microfibre cloth and gentle, pH-balanced cleaners makes a huge difference. I also agree that a soft detailing brush helps get into those tight crevices without risking sensor damage. The idea of using a damp cotton swab for stubborn spots is something I swear by—I always keep a few on hand for delicate areas.
But I wonder, has anyone experimented with ultrasonic cleaning for these small sensors? I’ve heard it can be effective in removing dirt without physical contact, but I’m curious about its safety and practicality in a regular garage setting. Also, regular maintenance seems key—do you all have tips on how often to clean these buttons to keep response time optimal? I’d love to hear more personal experiences or even tricks for maintaining these sensitive controls during daily use.