I remember the first time I handed my keys back at the end of a lease, only to notice tiny swirl marks and a dull finish that hadn’t been there when I first drove off the lot. It was a lightbulb moment—realizing how much a little maintenance could make or break that fresh-from-the-dealer look. Fast forward to today, and I’ve learned that a proper DIY approach to car detailing isn’t just about aesthetics; it’s about preserving value, avoiding costly penalties, and feeling proud every time I slide into a spotless driver’s seat.
Why Lease Turn-Ins Like 2026 Are Changing the Game for DIY Enthusiasts
What if I told you that with the right setups and a bit of know-how, you could outshine any professional service? Lease returns in 2026 are tightening standards, demanding that your vehicle looks its absolute best—think pristine paint, spotless interior, and flawless glass. But here’s the catch: many car owners, myself included early on, fall into common traps—using subpar products, neglecting essential prep steps, or going in blindly without a game plan. I made the mistake of skipping a proper paint correction before applying ceramic coatings, which left me with stubborn water spots. That taught me that investing a little time in research pays off—so I don’t get slapped with penalties or lose that deposit.
Given the surge in advanced materials like nano-ceramic coatings and microfiber technology, the landscape of DIY car detailing has evolved rapidly. According to industry expert Robert Schreck, the proper use of high-quality detailing kits can extend a vehicle’s lifespan and enhance resale value significantly. Plus, with innovations tailored for 2026 models, such as high-tech dashboard displays and performance-focused wheels, having the right supplies becomes even more crucial. Whether you’re aiming to impress lease inspectors or just want to keep your ride looking showroom fresh, understanding what tools and products really work can save you both time and money.
So, have you ever faced that sinking feeling when inspecting your matte paint after a quick wash? Do you worry that your interior isn’t quite up to spec for the upcoming turn-in? You’re not alone. I’ve been there too. The good news? There’s a way to tackle this challenge head-on, armed with the right DIY kits, expert techniques, and a dash of patience. Keep reading because I’m about to share everything I’ve learned—step by step—to help you make your lease car shine like new without breaking the bank.
And if you’re curious about mastering ceramic coatings or interior refreshers, I’ve got plenty of tips and trusted resources to share—including detailed guides on how to apply 2026 ceramic coatings for long-lasting protection, or how to clean high-tech dashboard displays safely. Ready to transform your vehicle and ace that lease turn-in? Let’s dive into the details.
Prep Your Vehicle Like a Pro
Begin by giving your car a thorough wash using a quality car wash soap, which acts like a gentle barrier—removing dirt without stripping protective layers. I recall the first time I used a foam cannon with professional-grade foam; it loosened stubborn dirt effectively as I soaked the surface, making the subsequent wash much easier.
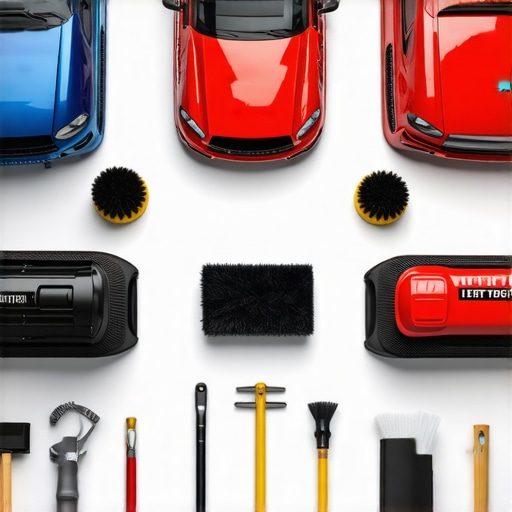
Use the Right Tools for Every Step
Equip yourself with microfiber towels for drying—these are like soft clouds that absorb water without scratching. For large vehicles, I recommend the 2026 microfiber towels designed for extensive coverage; they reduce dry time and improve finish. Mobile detailing water tanks with inline filters minimize water spots; I learned this the hard way when unfiltered water left mineral marks, but using filtered water made my paint shine seamlessly.
Execute Paint Correction with Precision
Identify swirls and scratches by inspecting your car in bright sunlight. Use paint correction pads paired with the appropriate polishing compound—think of them as the dental tools for your car’s surface. During my first attempt, I mistakenly used a coarse pad on delicate paint, which caused micro-marring. I switched to finer pads and polishing compounds, restoring that mirror-like gloss and avoiding further damage. For heavy imperfections or stubborn water spots, refer to this guide on removing water spots safely, ensuring a spotless finish before applying protective coatings.
Apply Advanced Protective Coatings
When ready for ceramic coating, think of it as armor for your vehicle. Follow a step-by-step process that involves cleaning, drying, and then applying the coating using an applicator like a suede cloth. For 2026 models, use the expert techniques outlined in this ceramic coating application guide. I vividly remember applying my first layer, working patiently in sections; the result was a blazing, slick finish that shed dirt easily, saving me time during future washes.
Refine the Interior with Careful Attention
Interior detailing involves more than vacuuming. Use specialized interior sprays to repel dust and prevent buildup, especially in high-touch zones. I used a safe interior cleaner on my dashboard and learned that the key is to spray lightly and wipe with microfiber cloths to avoid streaks. For high-tech displays, avoid harsh chemicals—opt for a soft cloth dampened with a cleaner tested for screens, following this screen cleaning technique. Regular maintenance with interior detailers ensures a fresh, professional look that impresses lease inspectors.
Breathe New Life into the Tires and Glass
Use dedicated tire cleaners and wheel-specific brushes—these tools are like a toothbrush for your car’s smile. Applying a coat of rim sealant according to manufacturer instructions prolongs cleanliness, especially during the rainy season. For glass, streak-free results come from a quality glass sealant and microfiber towels, like those I used from this selection for expert results: microfiber towel set. Properly cleaned glass enhances visibility and vehicle aesthetics, critical for a successful lease return.
Many car owners believe that choosing the most popular or expensive products guarantees a professional finish, but in reality, understanding the nuances can make all the difference. Everyone talks about using high-quality ceramic coatings or premium car wash soaps, but the real secret lies in matching products precisely to your vehicle’s paint type and surface condition. A common myth is that all DIY detailing kits are interchangeable; however, using a product designed for gloss rather than matte finishes, or choosing a right abrasive pad without considering your paint’s thickness, can lead to micro-marring and long-term damage.
Beware the trap of overusing paint correction compounds. Too aggressive a polish on delicate surfaces can thin the clear coat, reducing gloss and durability. Expert detailers know that mastering paint correction involves assessing surface hardness and choosing the right pad and polish combination. Remember, applying products with the wrong technique can cause hazing or swirl marks that are difficult to remove.
What advanced techniques elevate your detailing game beyond the basics?
As detailed by industry experts, using mobile detailing equipment like inline water filters and the right car wash supplies ensures spotless results without water spots or streaks, especially with high-tech surfaces prevalent in 2026 models. Moreover, understanding the microfiber towels composition and choosing those suited for specific applications — from interior cleaning to exterior finishing — reduces scratches and enhances shine.
A key mistake most overlook is neglecting to evaluate the surface condition thoroughly before selecting auto detailing products. For example, high-gloss paints require gentler abrasives, while heavily oxidized surfaces demand more aggressive correction. Informed choices are backed by studies showing that tailored product use significantly extends vehicle lifespan and maintains resale value. For instance, research by the Detailer’s Guild emphasizes surface-specific product matching as a cornerstone of professional-grade results.
Have you ever fallen into this trap? Let me know in the comments. The key to successful DIY car detailing isn’t just about owning the right supplies but understanding their proper application and limitations. Mastering these nuances will position you ahead of most enthusiasts and help you achieve that flawless, long-lasting finish that truly protects your investment.Maintaining a vehicle’s showroom shine over time depends heavily on the quality of your tools and the consistency of your routine. My personal arsenal includes a few key pieces that have proven their worth through my years of DIY detailing. First, a dual-action polisher like the Griot’s Garage Ridge Kit offers controlled, swirl-free paint correction, making it easier to tackle imperfections without causing micro-marring. I use it because of its variable speed settings and ergonomic design, which reduce fatigue during extended detailing sessions. To preserve that flawless coat, I rely on high-quality microfiber towels, specifically the 2026 microfiber towels for expert vehicle drying; they absorb water rapidly and prevent scratches. When applying ceramic coatings, I swear by the applicator pads outlined in this ceramic coating application guide. Their plush surface distributes the coating evenly, ensuring long-lasting protection. For water filtration during washes, inline filters from mobile detailing water-tank suppliers are crucial, especially in areas with hard water, as mineral deposits can ruin the finish. Over time, I’ve also invested in a professional-grade steam cleaner; steaming is gentler than chemicals and excellent for intricate interior parts and upholstery. As the trend shifts toward eco-friendly and chemical-free solutions, I predict automation and smart detailing gadgets will start playing a more prominent role in maintaining long-term vehicle care, making routine upkeep even more accessible.
How do I maintain my detailing tools over time?
Consistent cleaning and proper storage extend their lifespan. For example, rinsing microfiber towels thoroughly after each use and air-drying prevents bacterial buildup. Regular calibration of the polisher’s speed settings ensures even correction and prevents surface damage. Don’t forget to replace pads and brushes periodically; worn tools can cause scratches or uneven finishes. My advice? Try incorporating an ultrasonic cleaner to refresh your tools; it’s an investment that pays off in maintaining effective results and protecting your vehicle’s surface.In my journey of mastering vehicle care, I’ve discovered that the true value of DIY car detailing lies not just in the products used but in the lessons learned along the way. One of the most eye-opening realizations was how surface-specific knowledge, like understanding your paint’s unique needs, can dramatically alter results. For instance, discovering that matte finishes require gentle polishing instead of aggressive buffing prevented micro-marring and preserved that showroom look. Additionally, investing in quality tools like dual-action polishers and microfiber towels tailored for high-tech surfaces made a tangible difference, saving time and reducing errors. Lastly, consistently evaluating my techniques against industry standards helped me avoid common pitfalls, such as over-application of sealants, which can create hazy finishes. These insights, gained through hands-on experience and a passion to improve, empower me to deliver professional results without the high costs of commercial services.