Ever spent hours trying to get that stubborn dirt off your car, only to end up with swirl marks or dull paint? That was me not too long ago. I thought I was doing everything right—using the wrong products, rushing the job, and skipping some crucial steps. Let me tell you, it was a lightbulb moment when I realized I was wasting time and money on subpar supplies. The breakthrough came when I finally invested in the right top car wash supplies and ceramic coating kits. Since then, my car’s been gleaming, protected, and easier to clean. Today, I want to share that journey with you and help you avoid my early pitfalls. Whether you’re a seasoned DIYer or just starting out, mastering the right products and techniques can make all the difference in achieving that perfect, showroom shine without the professional price tag.
Why Choosing the Right Supplies Can Make or Break Your Car Finish
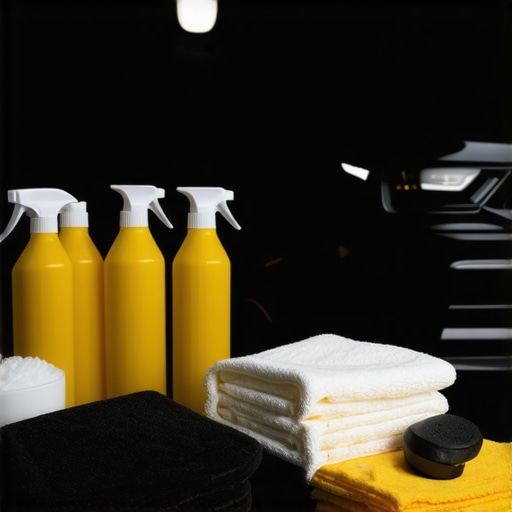
When I first dipped my toes into DIY car detailing, I thought any soap or wax would do the trick. Spoiler alert: it doesn’t. The wrong products can leave streaks, scratches, or even damage your paint over time. That’s why I recommend focusing on quality car wash supplies and ceramic coatings designed specifically for DIY enthusiasts. These products are formulated to be gentle yet effective, sealing your paint with a durable layer that repels dirt and UV rays. Trust me, it’s worth the investment. Plus, having the right tools—like microfiber mitts, proper sprayers, and quality applicators—can turn a tedious chore into a satisfying project. Curious about the best equipment? Check out the top mobile detailing kits in West LA, which are perfect for DIYers aiming for professional results.
Will Ceramic Coating Really Protect My Car?
This is probably the biggest question I hear. Honestly, I made the mistake of thinking a quick wax was enough—that was a rookie move. Ceramic coatings, when applied correctly, form a semi-permanent bond with your car’s paint, providing superior protection against scratches, chemicals, and environmental damage. But here’s the catch: not all coatings are created equal, and applying them improperly can lead to patchy coverage or reduced durability. Early on, I skipped the proper prep—cleaning thoroughly and decontaminating the surface—and it showed. Now, I always follow a detailed ultimate guide to ceramic coatings. The result? A glossy, protected finish that lasts months longer than traditional waxes. If you’re serious about protecting your investment, I highly recommend exploring the top kits available in your area.
So if you’ve ever felt overwhelmed by all the options or worried about damaging your paint, you’re not alone. With a little guidance and the right products, you can achieve a professional-level shine right in your driveway. Ready to dive into the world of DIY car detailing? Let’s get started on choosing the best supplies to transform your car care routine.
Start with a thorough wash using quality supplies
Before applying any polish or coating, you must clean your car meticulously. Use a top-tier car wash soap and microfiber mitts to remove dirt, grime, and loose debris. I remember one weekend when I decided to skip this step and jumped straight into coating; the result was a patchy finish that didn’t last. A proper wash not only prepares the surface but also prevents scratches during subsequent steps.
Use the correct wash technique
Work from the top down, rinsing frequently to avoid mudding dirt into your paint. Employ two buckets: one with soapy water and one with clean rinse water. This prevents recontaminating your wash mitt with dirt. When I first tried this method, I noticed a significant decrease in swirl marks and a smoother surface for the coating.
Decontaminate and prep the paint surface
After washing, use a clay bar or clay mitt to remove embedded contaminants. Think of this as exfoliating your skin — it creates a silky-smooth surface that enhances adhesion for the ceramic coating. I once skipped this step and applied coating over rough patches; the coating didn’t bond properly, leading to uneven protection. Always follow a detailed step-by-step decontamination process for best results.
Dry thoroughly before coating
Use a blower or microfiber towels to dry the car completely. Any residual water can dilute the coating or cause streaks. When I first tried to rush this step, I ended up with water spots that marred the finish, so I learned to be patient and dry meticulously.
Applying the ceramic coating effectively
Apply the coating in small, manageable sections. Use a foam applicator pad or microfiber cloth, and follow the product instructions precisely. Think of this process like painting — even, controlled strokes ensure even coverage. I experienced patchy areas when I applied too much product or didn’t work in small sections; now I work section by section, buffing off excess with a clean microfiber towel.
Get the right technique for buffing
Buff the coating with a fresh microfiber towel until it’s glossy and smooth. Don’t rush this; patience results in a mirror-like finish. Remember, the smoother the surface, the better the protection. I once hurried through buffing and ended up with streaks, which I then had to correct by reapplying a thin layer and buffing again.
Maintain your coating and supplies
After application, follow the recommended curing time before exposing your car to water or dirt. Regular washes with gentle products will prolong the coating’s life. Invest in quality auto detailing products to keep your finish looking fresh. When I started using dedicated maintenance shampoos, my car’s shine lasted weeks longer, reaffirming the value of proper upkeep.
Remember, success in DIY car detailing hinges on patience, precision, and quality supplies. With each step, you’re building a better barrier of protection and a more stunning finish. Keep practicing, and soon your car will resemble those professional jobs you admire.
While it’s tempting to believe that a quick wash and a cheap wax can keep your car looking pristine, there are several misconceptions that can lead you astray in your DIY detailing journey. As someone with extensive experience in automotive care, I’ve seen how these myths can cause more harm than good, especially when enthusiasts rush into projects without understanding the nuances.
One of the most pervasive myths is that any soap or detergent is suitable for cleaning your car’s paint. This couldn’t be further from the truth. Many household cleaners contain harsh chemicals that strip away the protective layer of your paint, leaving it vulnerable to oxidation and scratches. Instead, opt for a high-quality car wash soap formulated specifically for automotive finishes. These products are pH-balanced to clean effectively without damaging the clear coat.
Another common mistake is the belief that ceramic coatings are a magic bullet for protection. While ceramic coatings do provide an impressive barrier against UV rays, chemicals, and minor scratches, they are not foolproof. Many DIYers skip crucial prep steps like decontaminating and thoroughly cleaning the paint, which results in poor adhesion and reduced longevity of the coating. It’s essential to understand that proper surface preparation is the foundation of a successful ceramic application. For advanced users, mastering techniques like clay bar decontamination can significantly enhance the durability of your coating. Want to learn more? Check out the ultimate guide to ceramic coatings.
Why Skipping Surface Prep Can Undermine Your Detailing Efforts
Many DIY enthusiasts fall into the trap of rushing through the prep phase because it’s tedious and time-consuming. However, this step is crucial for ensuring the coating bonds properly and lasts as long as possible. Think of it like preparing a canvas before painting — if the surface isn’t smooth and clean, the final result will suffer. Skipping decontamination or rushing to apply a coating over a dirty surface can trap dirt and create uneven patches, leading to a dull or streaky finish that may require reapplication. As I’ve learned through trial and error, investing extra time in thorough prep saves you frustration and money in the long run.
For those seeking a more advanced approach, understanding the science behind surface chemistry can give you an edge. According to industry experts, the adhesion of ceramic coatings depends heavily on surface energy and cleanliness. Ensuring your paint is free from oils, waxes, and embedded contaminants maximizes the coating’s effectiveness. For equipment, consider using professional-grade mobile detailing tools and kits designed for precision work.
Finally, remember that patience and attention to detail are your best friends in DIY car detailing. Rushing through steps often leads to mistakes that can be costly—like uneven coating thickness or missed spots. Taking your time to learn and apply advanced techniques will dramatically improve your results, making your car not just clean, but truly protected and shining. Have you ever fallen into this trap? Let me know in the comments.
Keeping your DIY car detailing equipment in top shape is crucial for achieving professional-quality results consistently. Over time, even the best tools can degrade or become less effective without proper maintenance. Personally, I rely heavily on high-quality microfiber towels, foam applicators, and pressure washers, and I’ve learned that dedicated care extends their lifespan and performance. Regularly inspecting and cleaning your tools prevents dirt and grime buildup that can scratch your paint or reduce cleaning efficiency.
For example, I always rinse microfiber towels immediately after use and wash them in hot water with a gentle detergent, avoiding fabric softeners which can leave residues. Foam applicators should be rinsed thoroughly and stored in a dry, clean environment. Using a dedicated mobile detailing kit ensures you have the right brushes, pads, and sprayers designed for durability and ease of maintenance. This proactive approach minimizes cross-contamination and ensures each tool performs at its best on every job.
Investing in quality pressure washers has also been a game-changer for me. Modern models with adjustable pressure settings help me avoid damaging sensitive areas while still removing stubborn dirt. Regularly replacing worn-out nozzles and hoses, as recommended by industry experts, keeps the equipment functioning flawlessly. This not only saves time but also prevents costly repairs down the line.
Looking ahead, I believe the trend toward smart, connected detailing tools will continue to grow. Devices that monitor usage, provide maintenance alerts, or even suggest optimal settings will become standard, making DIY detailing more accessible and effective. For now, though, sticking to tried-and-true maintenance routines ensures your tools remain reliable.
How do I maintain my detailing tools over time?
Developing a routine of regular cleaning, inspection, and proper storage is key. After each detailing session, rinse all brushes, applicators, and microfiber towels thoroughly, then air dry or gently tumble dry without fabric softeners. Store tools in a clean, dry place to prevent mold and dust accumulation. Periodically, replace worn-out brushes and pads to maintain high performance. Following these practices has saved me time and money, and kept my car looking its best for years.
If you’re serious about long-term results, consider investing in maintenance-specific products like specialized detailing products that can protect and extend the life of your tools. Remember, the key to consistent, high-quality results isn’t just the products you use but how well you care for your equipment over time. Try implementing a simple maintenance routine today and see the difference it makes in your detailing projects.
3 Lessons That Changed How I Protect My Car’s Finish
- Surface prep is everything: I used to rush through washing and skip decontamination, but that only led to uneven coatings and a dull finish. Learning to clay bar and thoroughly clean before applying ceramic coating was a game-changer.
- Quality supplies save time and money: Investing in top-tier products like microfiber mitts and proper applicators meant fewer scratches, better coverage, and longer-lasting protection. It’s worth every penny.
- Patience pays off: Rushing the buffing or drying steps only caused streaks and rework. Taking my time, especially during coating application and buffing, resulted in a mirror-like shine that feels professional.
My Essential Toolkit for a Showroom Shine
- High-quality car wash soap: I swear by a pH-balanced, automotive-specific wash to keep my paint safe and clean without stripping protective layers. Check out the best car wash supplies.
- Clay bar or clay mitt: Removing embedded contaminants creates a silky-smooth surface that enhances coating adhesion. It’s an investment in your car’s future protection.
- Proper ceramic coating kit: I prefer comprehensive kits that include prep, application, and curing instructions. A well-applied ceramic coating can last months longer and withstand harsher conditions.
- Microfiber towels and applicators: Soft, plush towels are essential for buffing and wiping without scratches. I keep a set dedicated solely to detailing to avoid cross-contamination.
Fuel Your Passion and Keep Your Gear Sharp
Every detail I do is a step toward preserving my car’s beauty and value. Staying consistent with maintenance routines, investing in quality tools, and continually learning new techniques keeps me motivated. Remember, mastering DIY car detailing isn’t about being perfect—it’s about making your vehicle look its best and protecting it for the road ahead. Ready to take your car care to the next level? Dive into the world of professional-grade supplies and techniques today. How have your experiences with surface prep or applying coatings shaped your results? Share your story below!
Reading this post really resonated with me, especially the emphasis on proper surface prep before applying ceramic coatings. I initially thought I could skip some steps to save time, but I ended up with uneven coverage and less durability. Once I started following a meticulous process—especially using a clay bar and thorough cleaning—the difference was remarkable. It’s amazing how much the right technique and quality tools can impact the final finish. I particularly appreciate the advice on maintaining tools; I’ve found that good equipment really does make the job easier and results more professional.
For those just starting out, what are your go-to products for decontamination and surface prep? I’ve been exploring different clay bars and detailing sprays, but I’d love to hear what others recommend based on experience. Also, how do you balance between time and patience when working through each step? Sometimes I feel eager to finish, but I know rushing compromises the results. Sharing our tips can help everyone get closer to that flawless, showroom shine I strive for.