There was a moment during last summer’s road trip that still haunts me. I had just finished detailing my car meticulously, excited to hit the open highway with a spotless ride that would turn heads. But as I drove through a sudden rainstorm, I watched in horror as dirt, water spots, and stubborn bug remnants marred my shiny finish. My heart sank, realizing all my effort was wasted. That lightbulb moment made me realize: a good car wash isn’t enough—what I really needed was a reliable, comprehensive DIY detailing kit tailored for road trips.
Laid-back Solutions for a Dirty Situation
Is DIY Car Detailing Worth the Hype? Or Just a Glamorous Myth?
In my early days of DIY detailing, I made a classic mistake—trying to save a few bucks by grabbing a random bucket of soap and a sponge from the local store. Turns out, that simple error compromised my car’s paint and left swirl marks I couldn’t buff out without professional help. According to auto detailing experts, using the wrong products can cause more harm than good, especially if you’re on the go and need quick, effective results. That’s why I embarked on a mission: to find the best kits and supplies that would give me professional-quality shine, even when I’m miles away from my favorite detailing shop. If you’re wondering whether investing in a quality DIY kit is truly worth it, I say—trust me, it’s a game changer. Want to see what I found? Check out some of my top picks for car wash soaps and supplies for 2026, like the ones reviewed in this best guide. Now, let’s dive into what makes a great DIY kit and how to choose the right products for your next adventure.
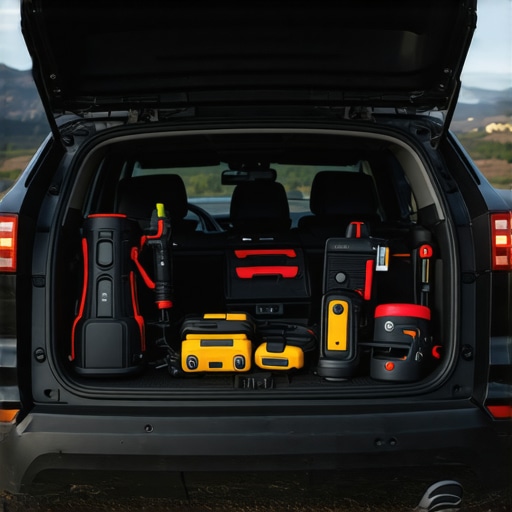
Prepare Your Supplies and Environment
Start by gathering all necessary products such as a high-quality car wash soap from top-rated car wash soaps and microfiber mitts. Choose a shaded, dust-free area to prevent premature drying or water spots. Place your mobile detailing equipment nearby, including a pressure washer, waterless wash kits, and polishing tools. Setting up an organized workspace is like laying a foundation—precision here ensures smooth progress later.
Deep Clean to Remove Contaminants
Wash with Purpose and Precision
Begin with a thorough rinse to remove loose dirt and debris, reducing the risk of scratching. Use a two-bucket method: one bucket for soapy water, another for rinsing your microfiber mitts. This minimizes dirt reapplication. Apply the soap generously and wash in straight lines rather than circles, as circular motions can cause swirl marks. Pay special attention to heavily contaminated spots like wheel wells and lower panels. For stubborn grime, consider using a dedicated wheel cleaner and brush set. Rinse thoroughly to leave a clean surface, ready for the next step.
Address Specific Paint Imperfections
If your car has scratches or bugs etched into the clear coat, targeted treatment is vital. For bug residue, use an enzymatic bug remover; for paint swirls, employ a DA polisher with suitable compounds. My first attempt involved a manual polish on a small hood area—initially messy with compound splatters—but the result was a remarkably clearer finish. Carefully follow product instructions, applying polish with a dual-action polisher for even, controlled results. For delicate surfaces, opt for microfiber pads to avoid marring the finish. Again, consult resources like professional polishing tips to perfect your technique.
Seal and Protect Your Work
Once the paint correction is complete, sealing is crucial for durability. Ceramic coatings are ideal for long-term protection, but a good wax or sealant can suffice for short-term needs. Before applying, ensure the surface is free of dust and oils. Use a foam applicator to spread the product thinly and evenly, then buff with a microfiber towel until glossy. For ceramic coating application, follow the specific instructions, often involving a series of thin coats, curing times, and proper curing environments. This step transforms your clean car into a protected masterpiece, ready to withstand environmental challenges. To keep your car looking pristine during rain or snow, consider installing high-performance glass sealants for rain protection.
Finishing Touches for Detail Perfection
Finally, don’t overlook the small details—clean and dress the tires with a dedicated tire shine, wipe down windows for streak-free clarity, and condition interior surfaces if necessary. This multi-layer approach is akin to putting a jewel in a setting; every detail enhances the overall appearance. For interior cleaning, opt for interior detailers that won’t leave greasy residues. Remember, consistency and quality tools are your best allies in achieving professional results in a DIY setting.Many car enthusiasts believe that applying a ceramic coating guarantees a permanent, flawless finish, but let’s dig deeper into this common misconception. In reality, ceramic coatings are often misunderstood; they require proper preparation, application, and maintenance to deliver optimal results. Overestimating their durability without correct application can lead to disappointment, especially since environmental factors like UV rays and harsh chemicals can degrade even the best coatings over time. Additionally, it’s a myth that ceramic coatings eliminate the need for regular washing—dirt and debris still adhere to the surface, necessitating suitable [car wash soaps](https://cardetailingservicesupplies.com/3-best-2026-car-wash-soaps-for-stripping-old-wax) for proper upkeep. Many ignore the importance of choosing high-quality [detailing supplies near me](https://cardetailingservicesupplies.com/top-5-2026-car-detailing-supplies-for-salt-removal), which can make or break your DIY efforts. An often overlooked nuance is that improper preparation before coating, such as failing to remove all contaminants like iron particles or old wax, can cause adhesion issues, leading to premature failure. Experts warn that neglecting these steps constitutes a common mistake among DIY enthusiasts, risking costly reapplications. Moreover, using subpar [auto detailing products](https://cardetailingservicesupplies.com/7-best-2026-car-cleaning-accessories-for-deep-vacuums) can introduce micro-marring or streaks, diminishing the coating’s effectiveness. Make sure you’re selecting the right [mobile detailing equipment](https://cardetailingservicesupplies.com/4-mobile-detailing-van-organizers-for-2026-professionalism) and tools to support your application process. The critical point here is understanding that ceramic coatings are not a magic bullet but part of a broader maintenance routine that includes proper washing, periodic polishing, and timely reapplications. This approach extends beyond simply choosing any [car wash soap](https://cardetailingservicesupplies.com/3-best-2026-car-wash-soaps-for-foam-cannons) or ‘miracle’ product; it demands knowledge, technique, and consistency. To avoid costly mistakes, educate yourself thoroughly by consulting trusted sources and professional guides, such as those detailing [paint correction](https://cardetailingservicesupplies.com/fixing-2026-paint-swirls-5-da-polisher-tactics). Remember, applying a ceramic coating without understanding its nuances can lead to issues like uneven coverage, cloudiness, or reduced hydrophobic properties—problems that are often invisible to the untrained eye but compromise your investment. Have you ever fallen into this trap? Let me know in the comments.
How do I keep my detailing equipment in top shape over time?
Maintaining your car detailing tools is crucial to ensure they perform optimally and extend their lifespan. I personally swear by using a combination of microfiber-specific detergents, like those outlined in specialized microfiber wash detergents, and a meticulous cleaning routine. After each use, I rinse brushes, polishing pads, and microfiber towels thoroughly with deionized water to prevent mineral deposits and soap residues that can cause micro-marring. Regularly inspecting and replacing worn-out brushes or worn microfiber pads prevents scratches caused by frayed fibers or embedded dirt. Storing equipment in a dedicated mobile detailing van, organized with professional storage solutions, keeps tools accessible and protected from environmental damage. Experts also recommend applying protective sprays on metal tools and plastic parts to prevent corrosion and UV degradation. The key is consistency—dedicating a few minutes after each job makes maintenance effortless and ensures your gear remains effective. Looking ahead, advancements like antimicrobial brush coatings and smart storage sensors are trending, promising even better tool longevity and performance. To maximize your tool investment, I suggest trying out a decontamination step involving a clay bar and iron remover periodically, which not only cleans the surface but also guarantees better adhesion of sealants and coatings, as detailed in expert advice on bug etching removal. Remember, well-maintained tools provide cleaner, safer, and more consistent results—so invest the time today to keep your equipment working for years to come. Have you tried any maintenance hacks that significantly extended your gear’s life? Share your tips in the comments!
Over the years, I’ve come to realize that achieving a flawless, long-lasting finish isn’t just about buying the latest products—it’s about understanding the nuances and lessons learned through hands-on experience. One of the most valuable insights I’ve gained is that patience and preparation trump quick fixes every time. Rushing through a detailing session often leads to micro-marring or missed spots, especially when working with delicate paints or coatings. Additionally, I discovered that investing in quality tools and supplies, like a reliable dual-action polisher and high-grade microfibers, dramatically elevates the results. Don’t underestimate the power of proper environment setup; detailing in shaded, dust-free areas prevents unwanted water spots and dirt adhesion. Lastly, consistent maintenance with the right car wash soaps for ceramic-coated vehicles and routine inspections keeps your investment protected and looking pristine longer. These lessons have transformed my approach from a casual hobby to a disciplined craft that continually yields professional-grade results.