It was a muggy Saturday afternoon when I finally looked at my reflection in the hood of my car and groaned. The paint, once glossy and vibrant, had started to show swirl marks and subtle scratches from months of DIY washes and quick fixes. Frustration crept in. I realized I was making the same mistake so many car enthusiasts do—thinking that a good shine at home is just a matter of applying some polish and calling it a day. But the truth? Achieving that mirror-like finish, especially in 2026, demands more than just the usual car wash supplies.
Why Maintaining That Perfect Finish Matters More Than Ever
In 2026, the competition for that flawless, head-turning shine is fierce. OEM paint finishes have become more delicate, requiring careful correction to truly pop. A mirror shine doesn’t happen by accident; it’s the result of meticulous paint correction and the right gear. Plus, with the rise of ceramic coatings and advanced polishes, you want to ensure your work stands up to today’s standards. Have you ever gone through a full detailing job only to notice scratches or dullness a week later? That’s because shortcutting the process can cost you that perfect mirror finish.
Have You Fallen For the Hype of Quick Fixes?
I’ve been there. Early on, I thought applying a thick coat of wax and calling it a day was enough. A quick buff, some spray sealant, and I was proud. But I learned the hard way — especially after a professional told me that rushing paint correction actually damages your clear coat over time. This is a common mistake among DIYers, often stemming from lack of experience or overlooking proper technique. Trust me, I paid for it with additional polishing to fix those mishaps. That’s why I want to share what I’ve discovered about proper paint correction and how you can achieve that pro-level mirror shine right at home.
Surprisingly, recent research indicates that improper paint correction can reduce a vehicle’s resale value by up to 20%. So, the effort isn’t just about vanity; it’s an investment in your car’s future. What’s more, with the right tools and knowledge, you can dodge these pitfalls. Want to learn how to avoid the common mistakes early on and bring that showroom gloss back? Let’s get into the practical steps that will make your next at-home detailing session truly mirror-worthy.
Prepping Your Vehicle for Flawless Results
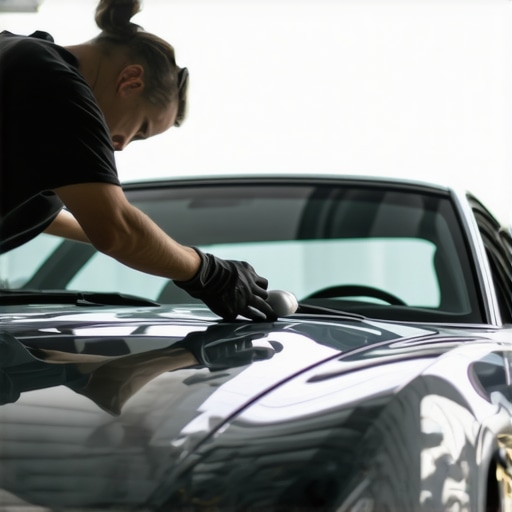
Before diving into paint correction, ensure your car’s surface is thoroughly cleaned with a high-quality, pH-neutral car wash soap. Use a two-bucket wash method to prevent dirt from scratching the paint, and opt for a microfiber wash mitt for gentle yet effective cleaning. As I learned early on, avoiding dirty wash tools is crucial—once, I used an old sponge that left micro-scratches, resulting in a dull, uneven finish. Switching to plush microfiber towels and dedicated wash supplies significantly improved my results and saved me time on corrections.
Choosing the Right Tools and Supplies for Correction
Use a dual-action polisher paired with the appropriate pads—foam for light correction, microfiber for deeper scratches. Think of your polisher like a blender: the right attachment makes all the difference. I once tried a cheap rotary polisher without proper pads, which caused uneven correction and burning the paint. Upgrading to a reputable, adjustable orbital polisher and quality pads, like those found [here](https://cardetailingservicesupplies.com/5-best-2026-cordless-polishers-for-mobile-detailers), gives you control and safety, especially when working on delicate clear coats.
Mastering the Technique for Effective Paint Correction
Apply a small amount of compound—about the size of a dollar—on the pad and work in small sections. Use moderate pressure and overlap passes; think of it as minting a coin with a stamp—precision matters. During my first try, I moved too fast and missed spots, causing an inconsistent finish. Slow, deliberate passes, combined with constant misting of a correction-specific spray (which helps lubricate and reduce heat), ensure even removal of imperfections. Checking your progress under proper lighting reveals micro-scratches or swirl marks that need further attention.
Finishing Touches with Polishing and Protecting
Once scratches and defects are removed, switch to a finer polish with a soft foam pad to refine the surface, enhancing gloss. This step is like polishing jewelry—it reveals clarity and depth. I once skipped this step, and the appearance was flat. After polishing carefully, apply a durable ceramic coating—a step I recommend for long-term protection [here](https://cardetailingservicesupplies.com/ceramic-coating-vs-wax-2026-verdict-for-daily-drivers). This coating forms a glass-like barrier, amplifying the mirror effect while safeguarding against contaminants and UV damage. For the best results, ensure the coating is applied in a dust-free environment, ideally with a heated workshop or shaded outdoor area.
Easy Maintenance to Keep That Shine
Maintaining your paint’s clarity requires regular, gentle washes. Use a soft wash mitt and avoid harsh brushes that could introduce new scratches. Follow with a quick detail spray and a quality ceramic spray sealant [like this](https://cardetailingservicesupplies.com/why-2026-ceramic-coating-sprays-beat-old-school-wax) to boost gloss in between full corrections. Remember, avoid abrasive cleaning products, and always park your car in shaded areas to prevent heat-induced micro-marring. This routine preserves your hard-earned mirror shine, making every drive a proud moment.
While many enthusiasts believe that owning high-end car wash supplies or advanced ceramic coatings guarantees a flawless finish, this oversimplification often leads to costly mistakes. One widespread myth is that cheap auto detailing products can deliver professional results. In reality, inferior products may contain abrasives or additives that damage your paint over time, undermining your long-term protection [source](https://cardetailingservicesupplies.com/why-2026-ceramic-coating-sprays-beat-old-school-wax). Moreover, the assumption that following a generic tutorial suffices ignores nuances like specific paint types and coating compatibilities, which can cause applicator streaks or poor adhesion.
A common experimental trap is misusing polish pads or improperly layering products. Applying too much pressure with a dual-action polisher can generate heat that burns the clear coat, leading to micro-etching and dullness. Advanced detailers emphasize the importance of understanding the thermal limits of your paint, especially when working on delicate finishes—something often overlooked by DIYers eager for quick results. Utilizing comprehensive knowledge about optimal correction techniques ensures the process preserves, rather than damages, your vehicle’s surface.
How does paint hardness influence correction approach in 2026?
This is a nuanced consideration that often isn’t appreciated by the casual DIYer. Softer paints, common on luxury and older vehicles, are more susceptible to holograms and swirls during correction. Conversely, hard, modern clear coats may appear resistant but are more likely to develop micro-scratches if improperly managed, especially with aggressive compounds. Recent expert insights highlight that selecting the appropriate abrasive grade and polishing technique tailored to your paint’s hardness minimizes defects and enhances gloss. Rushing or relying solely on high-speed polishing forces you into a trap that can damage sensitive substrates. For tailored advice, professionals recommend consulting manufacturer specifications or experienced paint correction guides, like those found [here](https://cardetailingservicesupplies.com/paint-correction-for-2026-sports-cars-pro-tips).
Further, many DIY enthusiasts underestimate the importance of precise surface preparation before applying protective coatings. Skipping thorough cleaning or misjudging the paint’s condition just before application compromises durability and appearance. Investing in proper auto detailing products and understanding their compatibility is crucial for achieving a lasting mirror shine. Remember, shortcuts today could mean costly repainting tomorrow.
Have you ever fallen into this trap? Let me know in the comments.
Investing in Quality Equipment Makes All the Difference
When it comes to maintaining a show-stopping finish, I can’t overstate the value of using professional-grade tools. A dual-action polisher like the Rupes BigFoot or Griot’s Garage polisher is my go-to. These machines offer a balance of power and control, reducing the risk of burning through delicate clear coats, especially on softer paint finishes common in modern vehicles. Personally, I’ve found that the adjustable speed settings and ergonomic design help me work efficiently without fatigue, ensuring each section gets the attention it deserves.
In addition to polishing equipment, high-quality microfibers such as the Lake Country Flat Pads are invaluable. They minimize micro-marring during polishing and finishing stages because of their dense weave and plush surface. Over time, I’ve seen how using cheap pads causes micro-scratches that diminish the mirror-like gloss I aim for. Switching to reputable pads not only enhances results but also reduces the need for unnecessary corrections later on.
The Right Products Elevate Your Results
For ultimate paint correction, I rely on compounds like Meguiar’s M100 or Griot’s Garage Elite Compound. These have precise abrasiveness levels for different defects and work well with my tools to remove swirl marks effectively. Don’t underestimate the importance of choosing the right polish afterward; a finer polish such as Menzerna 4000 can bring out jaw-dropping gloss, especially after corrections.
Long-term protection is crucial, too. I recommend a ceramic coating like GTechniq Crystal Serum Ultra. It offers a durable glass-like barrier that resists contaminants and UV damage, maintaining that mirror finish for months longer than traditional wax or sealants. Proper application technique—thorough surface prep and in a dust-free environment—ensures maximum adhesion and longevity. Look into detailed guides such as paint correction for expert results for nuanced tips on applying coatings effectively.
Building a Reliable Maintenance Routine
Tools aren’t just for correction; regular maintenance keeps your finish looking fresh. I swear by a high-volume foam cannon connected to my pressure washer, which makes quick work of dirt and prevents micro-scratches during wash. I primarily use the best high-gloss foam cannon gear. Combining this with pH-neutral soap plus microfiber wash mitts creates a gentle, effective cleaning cycle that preserves your costly coatings and paint corrections.
In the future, expect advancements in mobile detailing tech—like hybrid ultrasonic drying systems or AI-assisted spot correction apps. Staying updated with new products will give you an edge in keeping your vehicle in top condition without spending unnecessary time or money.
How do I maintain my tools over time?
Proper care extends the lifespan of your detailing equipment. Regularly clean polishing pads with pad cleaners or compressed air and store your devices in a dry, dust-free environment. Revisit your equipment periodically to check for wear or damage, replacing supplies as needed. Investing in quality tools today ensures your craftsmanship remains at a professional level for years to come. Trying out a high-quality polish or upgrading to a dual-action polisher with variable speed control can revolutionize your results—so go ahead and test one of these advanced tips during your next detailing session! 
What I Wish Someone Told Me About Pursuing a Mirror Finish
- Patience pays off—Rushing through paint correction can cause irreversible damage. Taking your time ensures a flawless outcome and preserves your car’s value.
- Tools are investments—Using high-quality polishers and pads made a significant difference in achieving professional results, saving me time and frustration in the long run. I recommend exploring options like those [here](https://cardetailingservicesupplies.com/5-best-2026-cordless-polishers-for-mobile-detailers).
- Proper preparation is key—Thoroughly cleaning and inspecting your paint surface before correction prevents introducing new imperfections, ensuring a smooth finish.
- Understanding your paint’s unique needs—Knowing whether your car has soft or hard clear coat influences your choice of compounds and polishing techniques, which I learned the hard way during a misstep with a softer finish.
- Protection enhances longevity—Applying a top-quality ceramic coating after correction preserves your shine and resists contaminants, making maintenance easier. Resources like [here](https://cardetailingservicesupplies.com/paint-correction-for-2026-sports-cars-pro-tips) provided valuable guidance during my application.
Tools and Knowledge That Elevated My Results
- Invest in a dual-action polisher—Models such as Griot’s Garage or Rupes have been game-changers in reducing holograms and swirl marks, especially on delicate finishes. My picks are supported by reviews on [this site](https://cardetailingservicesupplies.com/top-2026-car-wash-supplies-for-high-performance-maintenance).
- Use quality pads—Switching from cheap foam pads to those with dense microfiber surfaces minimized micro-marring, preserving the clarity of my finish. Lake Country Flat Pads are among my favorites.
- Choose the right compounds and polishes—Starting with a suitable abrasive compound and finishing with a fine polish like Menzerna 4000 helped bring out depth and gloss, which I initially underestimated.
- Learn from expert guides—Following step-by-step tutorials tailored to your paint type can prevent costly mistakes. The detailed tips [here](https://cardetailingservicesupplies.com/paint-correction-for-2026-sports-cars-pro-tips) enhanced my understanding significantly.
Remember, Every Car Deserves Your Best Effort
Getting that mirror-like finish isn’t about shortcuts; it’s about respecting your vehicle’s surface and dedicating the time to do it right. With the right tools, techniques, and patience, you can transform your DIY detailing from good to extraordinary. Think of it as an investment in your car’s future and your personal satisfaction. As you continue refining your craft, keep exploring reputable products and expert advice—your vehicle will thank you for it.