I remember the first time I tried to give my car a full detail at home. I bought a kit, watched a few tutorials, and dove right in. But what I didn’t realize was how overwhelming it could be—tons of products, conflicting advice, and a fear of messing up my paint. The worst part? I ended up wasting money on stuff I didn’t need and, honestly, not seeing the results I wanted. That was my lightbulb moment: effective DIY car detailing isn’t about just buying a bunch of products; it’s about choosing the right ones and using them correctly.
Why DIY Car Detailing and Ceramic Coatings Matter More Than Ever
In today’s world, where convenience and quality go hand in hand, more car enthusiasts are turning to do-it-yourself solutions to keep their rides looking sharp. Not only does it save money, but it also gives you a sense of pride every time you see your shiny, protected car. Plus, with the right DIY detailing kits and ceramic coatings, you can achieve a professional finish right in your driveway. But here’s the catch—without proper guidance, it’s easy to fall into common traps that ruin your paint or leave you frustrated.
Have You Faced This Common Detailing Dilemma?
Like many, I’ve been there—buying products blindly, unsure if I was applying them correctly, and wondering if I was really getting my money’s worth. Early on, I made the mistake of using a generic ceramic coating that turned out to be less effective because I skipped proper surface preparation. Trust me, that was a costly lesson. It’s why I’m passionate about sharing what works and what doesn’t, so you don’t have to go through the same trial and error.
What We Will Cover Today
In this post, I’ll guide you through selecting the best DIY car detailing kits and ceramic coatings near you, avoiding common pitfalls, and getting that showroom shine every time. Whether you’re a weekend warrior or just want to keep your daily driver looking fresh, I’ll help you make smarter choices and get professional results without breaking the bank. Ready to transform your car? Let’s dive into the essentials that will make your detailing efforts truly stand out.
Is the Hype Around Ceramic Coatings Actually Worth It?
One thing I wish I knew earlier was how easy it is to fall for marketing hype. Not all coatings are created equal, and some can be a waste of money if they don’t deliver on durability or gloss. I’ve learned that the secret is in choosing high-quality products, like those available from trusted suppliers. For example, checking out local auto detailing supplies can help you find the best options for your specific needs. Remember, a proper application—cleaning, prepping, and careful coating—is what makes the difference between a good shine and a long-lasting protection.
Start with a Solid Surface Preparation
The first step I took was thoroughly washing my car using a quality car wash soap. Think of it like cleaning a window before painting—dirt and grime can ruin the finish. I used a two-bucket method with grit guards to prevent scratching and rinsed thoroughly. Once clean, I dried the vehicle with a microfiber towel to avoid water spots. This initial clean sets the foundation for everything that follows.
Prepping the Surface for Best Results
Before applying any coating, I used a clay bar to remove embedded contaminants. Imagine using a gentle peel to lift stubborn dirt from your skin—this step smooths out the paint surface, ensuring the coating bonds correctly. I lubricated the clay with quick detailer spray and gently worked it across the paint. Afterward, I inspected the surface under good lighting to confirm it was spotless. Proper prep avoids trapping dirt underneath the coating, which can cause blemishes later.
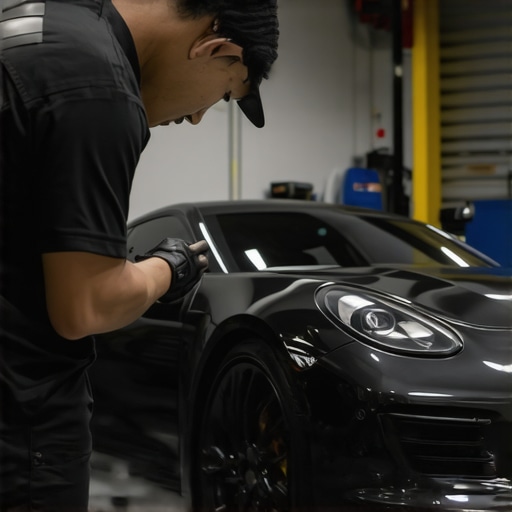
Applying the Ceramic Coating Properly
With a clean surface, I moved to the application phase. I opted for a trusted high-quality ceramic coating kit. I poured a few drops onto a foam applicator pad and worked in small sections, about 2×2 feet. Think of it like spreading butter evenly on toast—consistent coverage is key. I used overlapping circular motions to ensure even application, avoiding excessive product buildup that can cause streaks.
After about 3-5 minutes, I used a clean microfiber towel to buff the coating to a gloss. This step is critical—buffing removes excess and helps the coating cure properly. I repeated this process across the entire vehicle, working systematically to avoid missed spots. Patience here pays off: a well-applied coating can last years, protecting your paint from UV rays, dirt, and minor scratches.
Handling Mistakes and Troubleshooting
Early on, I over-applied in some areas, which led to streaks. I learned that less is more—apply thin coats for the best results. If you encounter streaks or high spots, a quick re-buff with a microfiber cloth can smooth things out. Remember, the goal is a sleek, even finish that repels water and dirt.
Maintaining Your Coating and Shine
Once cured, I avoided washing my car with harsh brushes or abrasive cleaners. Instead, I used a pH-neutral specialized wash soap to keep the coating intact. Regular maintenance like this preserves the glossy look and extends the life of your ceramic layer. For the best local supplies, I checked out auto detailing stores near me that stock quality products designed for DIY enthusiasts.
Many enthusiasts believe that simply buying a high-quality ceramic coating guarantees a perfect, long-lasting finish. While product quality is crucial, this misconception overlooks the nuanced realities of professional-grade detailing. In my experience, one of the most overlooked aspects is the importance of meticulous surface preparation, which many DIYers underestimate. Skipping proper cleaning, decontamination, and paint correction can severely diminish the coating’s effectiveness, regardless of how expensive or advanced the product is. For example, a study by auto care expert Mike Pennington highlights that surface prep accounts for up to 80% of a coating’s durability and gloss, emphasizing that application alone is not enough.
Another common myth is that ceramic coatings are completely foolproof and require minimal maintenance. This false belief can lead to neglecting regular washing with pH-neutral products and proper drying techniques. In reality, coatings like those available from local auto detailing supplies still need consistent care to maximize lifespan and appearance. Failure to do so often results in a dull finish or even premature failure of the coating.
A significant trap that many fall into is over-applying ceramic coatings in an attempt to boost protection or gloss. While it might seem intuitive to layer multiple coats, this can lead to high spots, streaks, or uneven curing, especially if the underlying surface isn’t perfectly prepped. Proper technique involves applying thin, even coats and allowing adequate curing time between layers. Remember, quality always beats quantity.
For advanced enthusiasts, understanding the importance of curing conditions is often overlooked. Ideal curing environments are typically cool, shaded, and free of dust, which many DIYers neglect, leading to micro-marring or dust inclusions that mar the finish. Ensuring optimal curing conditions can significantly influence the final result, making your DIY project look professionally done.
Finally, don’t forget that the application process itself requires patience and technique. Rushing or applying in poor lighting can cause missed spots or uneven coverage. Watching detailed tutorials and practicing on less visible panels before tackling the entire vehicle can save you headaches and ensure a flawless finish.
Have you ever fallen into this trap? Let me know in the comments. Remember, mastering DIY car detailing and ceramic coatings is a journey that combines the right products, proper technique, and patience. For those ready to elevate their skills, exploring top DIY kits and expert tips can make all the difference in achieving professional results at home.
Investing in the right tools is crucial for maintaining your DIY car detailing projects, especially when applying ceramic coatings. Personally, I swear by a high-quality dual-action polisher like the Porter Cable 7424XP. It provides consistent, swirl-free application and reduces fatigue during longer detailing sessions. Unlike cheaper models, this polisher has adjustable speed settings, allowing precise control for everything from surface prep to final buffing. If you’re serious about a professional finish, this tool is a game-changer.
Another essential item I rely on is a paint thickness gauge. This device helps me monitor the paint’s condition over time, ensuring I don’t accidentally remove too much material during polishing or correction. Maintaining the right paint thickness preserves your vehicle’s integrity while enhancing the longevity of your coating. I recommend the best auto detailing products that include these gauges for seamless integration into your routine.
For surface cleaning and decontamination, I prefer a nano-technology clay bar. It gently lifts embedded contaminants without scratching the paint, saving time and effort. I use a spray lubricant like Sonax Quick Detailer during this process, which helps the clay glide smoothly across the surface. Proper decontamination is vital before applying ceramic coatings, as even tiny particles can cause imperfections or reduce adhesion.
When it comes to applying the ceramic coating itself, I recommend a quality foam applicator pad. These pads distribute the coating evenly and help avoid streaks. I personally use the best ceramic coating kit that includes applicators designed for controlled, thin layers. Applying too much product or uneven pressure can compromise the coating’s durability, so take your time and work systematically.
Finally, a microfiber towel is indispensable for buffing off excess coating and achieving a mirror-like shine. I prefer plush, lint-free towels that can absorb residual coating without scratching the surface. Proper buffing not only enhances gloss but also ensures a smooth, durable finish that will last for years.
How do I maintain my ceramic coating over time?
Regular maintenance is key to keeping your ceramic coating effective. I recommend washing your vehicle with a pH-neutral car wash soap and drying with a microfiber towel. Avoiding abrasive brushes or harsh chemicals preserves the coating’s integrity. Additionally, applying a maintenance spray like a silica booster every six months can reinforce the protective layer.
Looking ahead, I believe advancements in nano-technology will make DIY coatings even more durable and easier to apply, reducing the learning curve for enthusiasts. For now, investing in these proven tools and techniques will ensure your project stands the test of time and keeps your vehicle looking its best. Want to take your detailing to the next level? Try using a dual-action polisher for larger panels—it’s faster, more even, and results in a professional finish every time.
What I Didn’t Expect About DIY Car Detailing
- One of the hardest lessons I learned was that surface preparation is everything. Skipping thorough cleaning, decontamination, and paint correction can make even the best ceramic coatings fail prematurely, leaving your car looking dull instead of glossy.
- Another surprise was how much technique matters. Applying a ceramic coating isn’t just about pouring and spreading; it’s about working in small sections with even pressure, patience, and good lighting. Rushing leads to streaks and high spots that ruin the finish.
- And I found that maintenance isn’t optional—regular washing with pH-neutral soap and gentle drying can extend the life of your coating significantly. Neglecting this step can turn that shiny finish into a dull surface within months.
- Finally, layering coats isn’t just a marketing gimmick; it requires proper curing time and thin application. Too much product at once causes high spots, which are a pain to fix later.
Tools and Resources That Changed My Approach
- Porter Cable 7424XP Dual Action Polisher: This tool made paint correction and coating application so much easier and more professional-looking. I trust it for even, swirl-free results.
- Paint Thickness Gauge: Protect your car’s integrity by monitoring paint layers. It’s a small investment that saves you from removing too much material during polishing.
- Nano-Technology Clay Bar: Gently removes embedded contaminants, ensuring a smooth surface for ceramic coating. Paired with quick detailer spray, it’s my go-to decontamination method.
- High-Quality Foam Applicator Pads: Applying coating evenly is crucial. I prefer foam pads designed for thin, controlled coats to avoid streaks or high spots.
- Microfiber Towels: For buffing off excess coating, plush, lint-free towels deliver a mirror finish and protect your work from scratches.
Take Action and Keep Your Car Looking Amazing
Mastering DIY car detailing and ceramic coatings is a rewarding journey that combines the right knowledge, tools, and patience. Keep learning, stay consistent, and don’t be afraid to experiment on less visible panels before tackling your entire vehicle. Remember, the effort you put in today will keep your car shining and protected for years to come. Are you ready to elevate your DIY detailing game and impress everyone with your shiny, protected car? Dive into those top DIY kits and practice regularly. Your car—and your pride—will thank you.
Reading through this post really resonated with my own DIY detailing journey. I remember the frustration of buying a lot of products that didn’t quite deliver, and it’s true—surface prep is everything. Using a clay bar and proper wash methods made a huge difference in the final look on my car. What I’ve found helpful is investing in a quality dual-action polisher, like the Porter Cable 7424XP, which really elevates the detailing game and ensures even application of coatings. I also try to do small patch tests for coatings and make sure I work in decent lighting to avoid missed spots. My question for others—how do you manage the curing environment to get the best finish? I’ve noticed keeping the car in a shaded, dust-free area during curing really helps maintain that mirror shine. Would love to hear tips from folks who’ve perfected their curing process! Overall, this article offers great advice for those starting out and looking to avoid common pitfalls, especially around product selection and application techniques.
This post really hits home for me. I’ve been on a journey similar to yours, starting with basic kits and realizing that surface preparation truly makes all the difference. I remember rushing through cleaning and skipping the clay bar step, only to be disappointed with the finish after applying coatings. Now, I always spend extra time ensuring my surface is spotless and contamination-free, which elevates the final look remarkably. I also learned that working in a clean, shaded environment during application and curing process can significantly impact the coating’s longevity and gloss. I’m curious—what’s everyone’s go-to method for creating the perfect curing environment? Do you prefer garage space, or do you have tips for outdoor curing in different weather conditions? I find that patience and detailed prep are critical, but sometimes unforeseen dust or direct sunlight can challenge even experienced DIYers. Looking forward to hearing some insights from this knowledgeable community! Overall, this article really offers practical advice for amateurs aiming for professional results without breaking the bank.
Reading this post truly resonated with me, especially the part about surface prep being the foundation of a perfect finish. I used to rush through washing and skip decontamination steps, which led to less satisfying results. Since I started dedicating more time to thorough cleaning, clay bar work, and proper drying, I’ve noticed a significant difference in how the ceramic coatings bond and shine. I also agree with the importance of working in a shaded, dust-free environment during application and curing, as dust particles can easily ruin that smooth, glossy surface. One tip I’d add is to use a dedicated curing blanket or cover if you’re doing it outdoors in windy or variable weather—that helps keep dust and sunlight at bay. Has anyone tested or recommended specific curing environments or accessories that have improved their results? I’d love to hear about effective techniques to ensure the coating cures perfectly every time, especially in less-than-ideal weather conditions.
I completely relate to this post because, in my experience, surface preparation is truly the cornerstone of a flawless ceramic coating application. Skipping steps like decontamination or rushing the process often results in a less glossy finish or even premature coating failure. Recently, I started using a dedicated curing tent when applying coatings outdoors, especially in windy or dusty conditions, and it’s made a noticeable difference in the curing quality. Has anyone else tried such gear? Also, I’ve found that working in the shade and maintaining a dust-free environment practically guarantees a professional-looking result, even as a DIYer. The post emphasizes patience and technique, which reminds me that even small details matter. Do you guys have favorite methods or tools for maintaining optimal curing conditions, particularly in less-than-ideal weather? Would love to hear more tips and tricks from this experienced community about perfecting the environment for curing ceramic coatings.