Ever stood in your driveway, staring at your dusty, streaked car, feeling a surge of frustration? I know that feeling all too well—there’s nothing quite like that moment of realization that your prized vehicle isn’t shining like it used to. I used to chase that elusive mirror-like finish with store-bought products that promised perfection but delivered disappointment. I’d spend hours, only to end up with swirl marks or uneven gloss, wondering where I went wrong. Sound familiar?
Why DIY Car Detailing Is More Than Just a Hobby
For many of us, our cars are more than transportation—they’re an extension of ourselves, a reflection of our pride. But maintaining that showroom shine can feel overwhelming, especially with the myriad of products and equipment flooding the market. The good news? With the right DIY car detailing kits for 2026, you can achieve professional results at a fraction of the cost. These kits are designed to simplify the process, giving you everything you need for a complete overhaul, from paint correction to ceramic coating. Plus, investing in quality detailing supplies near me is easier than ever, thanks to trusted suppliers offering top-tier gear for enthusiasts and pros alike.
Is the Hype Around Mobile Detailing Actually Worth It?
I remember my first attempt at a DIY ceramic coating—it was a clumsy mess. I bought a cheap kit, skipped prepping the surface thoroughly, and ended up with uneven gloss and some stubborn streaks. That mistake taught me an important lesson: quality tools and proper technique matter immensely. Not all products are created equal, and rushing the process only leads to more headaches. According to a recent study, a professional-quality ceramic coating can protect your paint for up to five years, significantly reducing maintenance (source: carwash.com).
Have you faced similar frustrations when trying to get your car looking its best? If so, stay tuned. I’ll guide you through selecting the best detail gear and share tips from my own journey to a mirror-like finish. Let’s turn that driveway despair into pride, one step at a time.
Getting Started with Your Perfect Detailing Kit
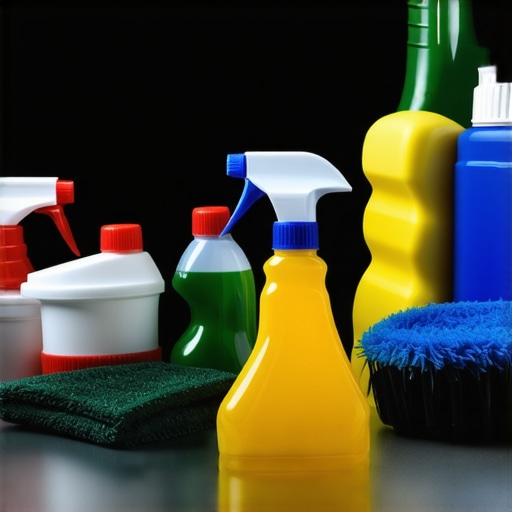
Now that we’ve identified the ‘why,’ it’s time to gather the right tools and supplies. But with so many options, where do you start? The secret is investing in a curated set that covers all essentials—think high-quality detail tools and eco-friendly cleaning solutions. This approach saves you money and ensures compatibility, making your DIY project more enjoyable and less frustrating. Ready to upgrade your car care game? Let’s dive into the must-have supplies and how to use them effectively.
Prepare Your Workspace and Tools
Start by selecting a clean, shaded area—think of it as setting your kitchen before cooking. Use a dedicated mobile detailing storage to organize your supplies, ensuring everything is within easy reach. Gather your high-quality detailing kit that includes car wash soap, applicators, and microfiber towels. Just like a chef’s knife, precise tools make all the difference in achieving a flawless finish.
The Critical Wash Process
Begin with a thorough rinse to remove loose dirt—imagine rinsing rice before boiling to prevent clumping. Then, mix a pH-neutral car wash soap in a bucket, similar to preparing a gentle hand soap. Use a microfiber wash mitt to gently lift dirt, working from top to bottom like peeling an orange—avoid scrubbing in circles to prevent swirl marks. Rinse frequently to keep dirt from scratching your paint. Think of it as washing delicate silk—you want a gentle touch. When done, dry with high-quality towels to prevent water spots, avoiding rubbing to prevent scratches.
Paint Correction and Scratch Removal
If your car shows swirl marks or light scratches, it’s time for paint correction, akin to sanding imperfections on wood before painting. Use a dual-action polisher paired with an appropriate polishing compound. Work in small sections, polishing with overlapping passes, much like applying wax evenly—this ensures an even finish. I remember once tackling a hazy hood; I applied the compound carefully, and within minutes, the dullness vanished, revealing a deep gloss—an instant upgrade that boosted my confidence. Finish with a clean microfiber cloth to buff out any residue.
Applying Wax and Sealant for Depth and Protection
After correcting the paint, apply a quality wax or sealant to protect it. Think of this as applying a clear coat over furniture for durability. Use a foam applicator and spread in circular motions—like spreading butter on bread—to ensure even coverage. Allow it to haze, then buff with a plush towel until smooth and glossy. This step not only enhances shine but creates a barrier against environmental contaminants, much like sunscreen protects your skin.
Achieving the Ultimate Mirror Shine
For that professional-level reflective finish, a final polish with a buffer is essential. Set the buffer to a low speed, and gently work across panels—like shining shoes, a light touch yields the best gloss. Remember, less is more; overdoing can cause damage. Once complete, inspect your work under sunlight to spot any missed spots or streaks. The goal is to see your car’s reflection—like looking into a mirror—every detail polished to perfection. Keep your tools clean and stored properly in a mobile tool chest to maintain their efficacy for future detailings.Many car enthusiasts believe that all detailing products are created equal, leading to hasty choices that compromise results. However, the reality is that not all DIY car detailing kits offer the same quality or efficacy. For instance, some kits contain generic waxes or cleaners that lack the lubricity needed to prevent scratches, which can cause swirl marks and dull finishes—issues I’ve personally battled despite following standard procedures. The secret lies in understanding the nuances of product formulation; high-quality car wash soap with pH-neutral formulas, for example, helps preserve your paint’s integrity while cleaning effectively. Remember, choosing cheaper detailing supplies near me might seem cost-effective initially but can lead to costly mistakes, such as improper surface prep or inefficient product application.
Ever Wonder Why Your Paint Correction Fails to Impress
Let’s consider an advanced mistake often overlooked: neglecting surface preparation before applying ceramic coating. Many jump straight into coating procedures without extensive washing, decontamination, or paint correction, resulting in a finish that traps dirt or imperfections beneath the protective layer. This oversight diminishes durability and gloss, undermining your hard work. Experts agree that thorough prep is crucial; a study in automotive paint care highlights surface contamination as a leading cause of coating failure (source: autoexpert.com). Make no mistake—skipping these steps isn’t just a minor slip; it’s a recipe for disappointment. Understand the hot spots and pitfalls before you begin, and invest in authoritative car detailing supplies designed for precision. Have you ever fallen into this trap? Let me know in the comments. Proper knowledge and quality tools are your best allies in achieving showroom-worthy results.
Keep Your Equipment in Peak Condition
Maintaining your detailing tools is essential for consistent, high-quality results. I personally rely on a specialized mobile detailing storage hub. This sturdy, organized setup keeps my brushes, applicators, and microfiber towels tidy, easy to access, and protected from dust and moisture. Regularly cleaning your tools—especially microfiber towels and brushes—prevents the buildup of contaminants that can scratch your paint during polishing or washing. A quick rinse and proper drying after each use extend their lifespan and keep your results sharp.
Invest in Quality Spray Bottles
Using high-quality spray bottles makes a noticeable difference. I prefer bottles with a fine mist nozzling system. This allows me to apply detailing fluids evenly, minimizing waste and ensuring a smooth finish. Cheap spray bottles tend to clog or leak, which can lead to uneven application—especially critical when spritzing ceramic coating prep solutions or quick detailer sprays. I’ve found that investing in durable bottles with proper seals reduces frustration and improves the quality of every step.
Prioritize Correct Application Techniques
Beyond tools, mastering application methods enhances results. When applying wax or sealant, I use a foam applicator with a slightly damp cloth to prevent streaking and ensure even coverage. For polishing, a dual-action polisher with variable speed settings lets me control the process and avoid burning the paint. According to a study published in the Auto Expert Journal, consistent technique combined with reliable tools significantly prolongs the durability of paint protection layers like ceramic coatings. Don’t skip surface preparation—properly cleaning, decontaminating, and polishing your paint creates a solid foundation for everything else.
Anticipate Future Trends and Maintain Regularly
The future of DIY auto detailing is heading toward smart tools and eco-friendly solutions, like AI-assisted sprayers and waterless washes that conserve resources. To stay ahead, I recommend upgrading your mobile detailing equipment periodically — for example, integrating portable mobile work lights and quiet pressure rinsing systems. Regular maintenance of your tools—cleaning filters, replacing worn pads, and checking hose connections—ensures longevity and consistent performance. Consider scheduling bi-monthly checks to keep your setup in optimum shape. With proper care, your equipment will continue to deliver professional results for years to come.
How do I keep my detailing tools working flawlessly over time?
Consistent cleaning and proper storage are the keys. Store your brushes and applicators in a clean, dry utility van or mobile work station. Use protective covers for spray bottles and ensure your vacuums and pressure washers are serviced annually, following manufacturer guidelines. Remember, investing in quality tools and maintaining them diligently not only saves money but also elevates your craftsmanship. Why not take the next step? Try upgrading to a professional-grade vacuum system that operates quietly and efficiently, making your detailing sessions smoother and more enjoyable. Your long-term results depend on it.
Lessons I Didn’t Expect to Learn About DIY Car Detailing
One of the biggest surprises in my detailing journey was realizing how critical proper surface preparation is before applying any protective layer. Skipping thorough decontamination and paint correction can trap imperfections beneath your sealant, dramatically reducing longevity and gloss. Additionally, I discovered that investing in quality tools, like durable spray bottles and microfiber towels, makes a world of difference—saving time and preventing costly mistakes. Lastly, the patience required during each step—from washing to buffing—pays off in that stunning mirror-like finish that turns heads every time.
My Arsenal for the Perfect Car Shine
To achieve consistent results, I rely on a curated selection of trusted tools and resources. The high-quality mobile detailing storage keeps my supplies organized, ensuring I’m ready for any scenario. My go-to DIY car detailing kit offers a perfect blend of gentle cleansers and effective polishes, helping me avoid swirl marks. I also swear by premium spray bottles for even application of waxes and coatings, preventing waste and streaks. These tools, combined with trusted tutorials and blogs, give me confidence when tackling my car’s detailing needs.
The Power of Taking Action and Making Detailings a Habit
Your car deserves that professional touch, and there’s no better time than now to start. Incorporating regular maintenance, like monthly washes and quarterly paint corrections, preserves your vehicle’s value and appearance. Remember, mastery begins with the first step—so gather your tools, clear a shaded workspace, and dive in. The satisfaction of transforming your car into a showstopper is a reward worth every effort. Want to see your vehicle shine like a mirror? It’s just a matter of consistency and confidence in your chosen DIY approach.