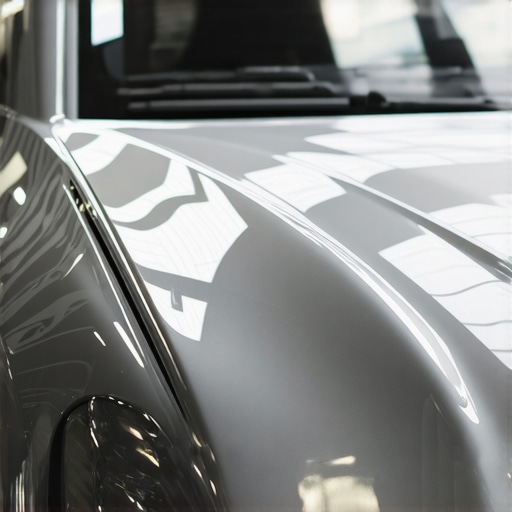
Have you ever stood in your garage, eyes fixed on your sleek new car, and just felt that sinking feeling when you notice tiny bubbles forming under the paint protection film? It’s happened to me more times than I care to admit. One afternoon, after hours of carefully applying what I thought was the perfect film, I discovered a cluster of stubborn bubbles marring the surface. That moment was a lightbulb flickering on—this isn’t as straightforward as it seems.
Why Bubble-Free Application Matters More Than Ever
Applying 2026 paint protection film (PPF) without bubbles isn’t just about aesthetics; it’s about safeguarding your investment. Bubbles can trap dirt and moisture, leading to premature deterioration or even damaging the paint beneath. As someone who’s learned the hard way, proper technique can make all the difference in achieving that flawless, mirror-like finish that lasts.
If you’ve been frustrated by bubbling or skeptical about whether perfect application is even possible, you’re not alone. The good news? With the right approach, you can master bubble-free installation, even if you’re just starting out.
Is PPF Application Actually Worth the Hype?
Let’s face it—early on, I made the mistake of rushing through the process without prepping the surface properly. I thought a quick wipe-down was sufficient, but I overlooked some crucial cleaning steps, which led to trapped debris and air pockets. Trust me, taking the time to thoroughly clean and prepare the surface is essential. For detailed tips on surface preparation, I recommend checking out [this article](https://cardetailingservicesupplies.com/4-paint-correction-tips-for-2026-expert-clear-coat-repair).
Now, my secret weapon has been adopting a systematic approach—careful cleaning, proper tools, and patient techniques. It’s not just about following a set of instructions but understanding why each step matters.
Are you facing the same struggles? Have bubbles already ruined your last attempt? If so, you’re not alone, but the good news is that this is entirely doable with some expert guidance. Stick around, because I’ll walk you through the essential steps to applying 2026 PPF smoothly, safely, and bubble-free, transforming what seems daunting into a satisfying DIY win.
Prepare the Surface Meticulously
Start with a thorough cleaning akin to preparing a canvas before painting. Use a pH-balanced, foam cannon-sprayed car wash soap instead of dish soap, which can strip coatings. Rinse off loose debris with a pressure washer set to low pressure to prevent paint damage. Then, wipe the surface with a microfiber towel dampened with isopropyl alcohol to remove residual oils or wax, ensuring optimal adhesion. I once skipped this step and noticed micro-bubbles forming shortly after, illustrating the importance of surface prep.
Use Quality Tools and Materials
Select a high-quality, micro-foam application squeegee with a soft, flexible edge to prevent scratching. Mix a slip solution with 70% isopropyl alcohol and distilled water in a spray bottle; this reduces the film’s tackiness, allowing easier positioning and bubble control. On a recent project, using inferior tools caused creases and trapped air—so investing in proper tools is a game-changer.
Plan Your Application Strategically
Position the PPF accurately before activation. Roll out the film gradually, aligning it with the panel edges. Use tape or markers to ensure straight placement. Work in sections; trying to cover large areas at once increases the risk of air entrapment. I learned this by attempting a full hood application, which led to numerous bubbles. Breaking it down into manageable sections simplifies the process.
Master the Squeegee Technique
Begin in the center of the panel, applying firm, even pressure with your squeegee, pushing outward towards the edges. Use overlapping strokes to expel trapped air and excess slip solution. Maintain consistent pressure to avoid creating new bubbles. During a recent DIY, slow, deliberate passes helped me eliminate stubborn bubbles, resulting in a smooth finish. Remember, patience is key—rushing causes more issues.
Control Air and Moisture During Installation
Keep the environment humidity-controlled and work in a temperature range of 60-80°F (15-27°C). Use a heat gun on a low setting to gently warm the film if it becomes too stiff, aiding better conformability. In my experience, cold conditions made the film brittle, increasing bubble formation. Avoid direct sunlight, as heat can cause the film to shrink unpredictably.
Address Bubbles Promptly and Properly
If bubbles appear, don’t panic. Use a pin to gently puncture the bubble’s edge and press out the air with your squeegee. For larger bubbles, carefully lift the film edge near the bubble and reapply, smoothing out as you go. Practicing this technique saved me from discarding a nearly perfect installation after an accidental bubble formation.
Post-Application Inspection
Once the film is installed, double-check all edges and surfaces for any trapped debris or bubbles. Use a clean microfiber cloth to wipe down the surface, removing remaining slip solution. A final light pass with a heat gun can help ‘set’ the film and reduce minor imperfections. Remember, proper curing involves avoiding washes for at least 48 hours to prevent contamination or bubbling issues.
When it comes to maintaining your vehicle’s pristine condition, it’s tempting to believe that a good car wash soap or a flashy auto detailing product is all you need. However, many enthusiasts and professional detailers alike fall into common traps by overlooking the nuanced chemistry behind these products. **Let’s dig deeper into what most people get wrong about car cleaning supplies and how understanding this can elevate your detailing game.**
Why Popular Car Wash Soaps Might Be Saboteurs, Not Saviors
Contrary to the popular belief that all car wash soaps are created equal, many common formulations contain ingredients that can strip or dull your vehicle’s protective coatings if used improperly. For example, dish soaps, often thought to be budget-friendly, are pH unbalanced and can weaken waxes or ceramic coatings over time, leading to quicker deterioration. Instead, opt for pH-balanced, dedicated car wash soaps. Using the right soap matters—and that’s just the beginning. Smart choices here set the tone for the rest of your detailing process.
Advanced Mistakes in DIY Car Detailing Routines
Many DIYers incorrectly assume that cheaper or lower-quality car cleaning products will do the trick. But in reality, using subpar detailing supplies near me or inexpensive car wash kits often results in micro-scratches or incomplete removal of contaminants, which can impair the effectiveness of later steps like ceramic coating application. A critical step frequently missed is the thorough removal of embedded contaminants such as iron particles, which can cause swirl marks or bonding failures. Incorporating tools like iron removers can make a noticeable difference, especially in areas prone to industrial fallout. For expert tips on this process, see our guide to iron removers.
Is Your Choice of Detailing Supplies Near Me Really the Best?
Shopping locally for detailing supplies near me can be advantageous, but it also warrants careful scrutiny. Not all local vendors carry authentic, high-quality products, and some may stock cheap imitations or expired items. Doing research and asking for professional recommendations ensures you get legit products that meet your needs—particularly when selecting advanced auto detailing products like ceramic coatings or paint correction compounds. Remember, using inferior products risks wasting your effort and money—and ultimately damages your vehicle’s finish. For premium ceramic coatings, consider these expert-approved options.
What’s a Common Myth That Could Hurt Your Car’s Finish?
One persistent myth is that more product equals better results. In reality, overusing car detailing products—be it waxes, polishes, or cleaning sprays—can lead to buildup, uneven layers, and diminished shine. Applying products as per manufacturer instructions, in thin, even coats, and waiting for proper curing times ensures each layer performs optimally. For the best results with ceramic coatings and other advanced products, proper application techniques are key. Check out our detailed tips for paint correction.
Make Your Detailing Expertise Count
Understanding these nuanced pitfalls and misconceptions can significantly enhance your vehicle’s appearance and longevity. Proper product selection, application, and maintenance routines create a synergy that professional detailers leverage every day. If you’re serious about upgrading from DIY basics to expert-level results, consider exploring comprehensive kits or professional-grade tools tailored for enthusiasts like you. Dive into our DIY car detailing kits for 2026 to start your transformation today. Remember, the difference between average and exceptional is often in the details—so get educated, choose wisely, and give your vehicle the care it deserves. Have you ever fallen into this trap? Let me know in the comments.
Invest in Quality Equipment for Consistent Results
Maintaining your vehicle’s appearance over time hinges on the right tools. I swear by a dual-action polisher for paint correction because it offers excellent control and even application without risking damage to delicate finishes. When I first started, I tried a random orbital buffer, but after reading this guide, I switched to models with variable speed settings, which allowed me to customize power based on the task. For high-gloss finishes, invest in a polishing pad with microfiber edges—these help avoid micro-marring and produce a mirror-like effect.
Harnessing Software for Better Maintenance
Beyond physical tools, software solutions like detailed maintenance logs can help track your procedures and product longevity. I use a simple app to note when I last applied ceramic coating or performed a deep paint correction, ensuring I stay consistent and don’t overlook crucial upkeep. This habit reduces the risk of prematurely needing extensive repairs or reapplications. Trends suggest that in the near future, AI-driven diagnostics might even identify paint issues before they become visible—meaning proactive care will be standard among enthusiasts and professionals alike.
Prioritize Proper Cleaning Agents for Longevity
Choosing the right cleaning products is vital. I always recommend a pH-balanced car wash soap, which preserves waxes and coatings. Using overly harsh detergents or dish soaps might seem convenient but can strip protective layers over time, leading to increased wear and tear. After years of experimentation, I trust products like these specialized soaps, designed specifically for vehicle finishes. Regular maintenance with the proper supplies can extend the lifespan of your ceramic coatings and paint correction efforts.
How do I maintain my detailing tools over time?
Maintaining your equipment ensures consistent performance. After each use, I thoroughly clean microfiber pads with a dedicated wash detergent and store polishers in a climate-controlled cabinet. Regularly inspecting and replacing worn-out pads or brushes prevents micro-scratches. For electric tools, using a voltage regulator can prolong their lifespan and prevent motor burnout. Staying disciplined with upkeep guarantees your investments payoff through reliable, professional-quality results every time.
Looking Ahead: The Future of Car Detailing Equipment
The evolution of auto detailing tools is moving towards automation and smart integration. Expect more devices equipped with sensors that provide real-time feedback on surface conditions or suggest optimal polishing speeds. As technology advances, utilizing these innovative tools will become crucial for achieving and maintaining premium finishes with less effort and higher precision. For example, emerging AI-powered systems are already assisting in analyzing paint clear coats — enhancing your ability to correct flaws with minimal material waste.
One Advanced Tip to Try Today
If you haven’t already, experiment with a specialized polishing polish designed for expert-level mirror finishes. It can dramatically improve your results, especially when combined with a high-quality dual-action polisher. Incorporate this into your routine and witness how it transforms your vehicle’s appearance into a showroom-worthy shine. Ready to elevate your detailing game? Give it a shot and see the difference for yourself. Delve into more strategies by exploring our comprehensive paint correction tips.
.
Lessons from the Trenches of Applying 2026 PPF
One of my biggest wake-up calls occurred when I realized that rushing the application process only led to more bubbles and frustration. I learned that patience and meticulous surface prep are vital—not just for flawless results but to truly protect your investment. Using inferior tools or neglecting proper techniques isn’t just a small mistake; it’s a recipe for costly redós and subpar finishes. The lesson? Every detail counts, especially when striving for that perfect mirror shine.
Furthermore, I discovered that environmental factors like temperature and humidity play a silent yet significant role. Warming the film slightly with a heat gun and working in controlled conditions drastically reduces risks of bubbling and shrinking. It’s these subtle adjustments that elevate your success from average to professional quality. These hard-won insights are now my standard, and I believe they’ll transform your approach too.
Tools and Resources That Elevated My Detailing Journey
To consistently achieve bubble-free application, I rely on a few trusted resources. A high-quality micro-foam squeegee and a well-mixed slip solution are indispensable; I swear by expert-grade polishing compounds for finishing touches. For surface prep, following guides on paint correction techniques has transformed my work. And for ongoing maintenance, ceramic coatings resources give me longevity and peace of mind. These tools and knowledge bases are my secret weapons, and I trust them to keep my results consistent.
Turn Passion into a Journey of Excellence
Learning to apply 2026 paint protection film and mastering the nuances of car detailing isn’t just about the end result—it’s about the satisfaction of doing it right and protecting your vehicle for years to come. Every step, from initial cleaning to final inspection, shapes the quality of your work. Don’t let bubbles or mistakes hold you back; instead, embrace the learning process and lift your skills to the next level. Take pride in every detail, because your vehicle’s shine is a reflection of your dedication.