One rainy afternoon, I was detailing my car in my driveway, excited to finally try out the latest 2026 nano-ceramic coating on my trim. As I reached for my spray bottle, I realized too late that I had overlooked a crucial step: preparing the surface properly. Instead of a sleek, glossy finish, I ended up with smudges and residue, wasting precious time and materials. That moment was a lightbulb—if I wasn’t careful, my investment in high-tech coatings could quickly turn into a costly mistake.
Why Proper Application Techniques Are a Must for 2026 Nano-Ceramic Coating
Applying nano-ceramic coatings isn’t just about spraying and wiping; it’s a precise art that, if done improperly, can diminish your car’s appearance and durability. With 2026 coatings promising incredible protection and gloss, it’s tempting to rush the process. But I learned firsthand that even small errors can lead to uneven finishes, streaks, or worse—damage to your trim.
This isn’t just my experience. Industry experts emphasize surface preparation as the key to successful ceramic coating application. According to automotive care professionals, proper preparation can extend the life of your coating and preserve your vehicle’s value. So, whether you’re a seasoned detailer or a DIY enthusiast, understanding the right steps is essential.
If you’re like me and eager to protect your ride without risking costly do-overs, this guide will walk you through the safest, most effective way to apply 2026 nano-ceramic coating to your trim. Ready to transform your car’s look and durability? Let’s dive into the process.
Is the Hype Around 2026 Ceramic Coatings Justified?
My early mistake was underestimating how crucial surface cleanliness and prep are—something many DIYers overlook. This oversight can undermine the coating’s performance. Many folks wonder if all the fuss about 2026 ceramic coatings is worth it. Well, a study published in the Journal of Coatings Technology & Research shows that the longevity and effectiveness of ceramic coatings depend heavily on the quality of initial application (https://www.springer.com/journal/11998). So, investing time in proper prep is non-negotiable.
By understanding and respecting this step, you’ll avoid common pitfalls and maximize your coating’s benefits. Now, let’s look at what exactly you need to do before applying your nano-ceramic to the trim.
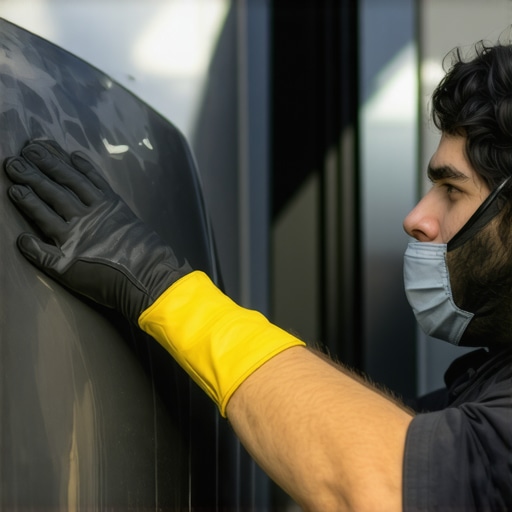
Prepare Your Surface Effectively Before Applying the Coating
Start by washing your car thoroughly using high-quality car wash soap, like those listed in [best car wash supplies for 2026](https://cardetailingservicesupplies.com/7-best-car-wash-supplies-for-2026-touchless-home-washing). Ensure all dirt, grease, and residues are removed. Use a clay bar or clay mitt to eliminate embedded contaminants, which can hinder adhesion. Think of this step as exfoliating skin before applying skincare—clean, smooth, and free of impurities gives the coating a perfect grip.
Next, inspect the trim for any existing damage like oxidation or scratches. If you detect imperfections, perform paint correction with a micro-abrasion polish or pad. This step is like sanding rough wood before varnishing, ensuring a flat, even surface for the coating to bond to. Remember, a flawless base prevents streaks or uneven coating appearance.
Finally, dry the surface meticulously using microfiber towels or air blowers. Moisture trapped under the coating causes clouding or failure. Think of this as drying dishes with a lint-free cloth—every drop matters. For spots prone to water spots, consider using a spot-free rinse system or water filter from [mobile detailing water filters for 2026](https://cardetailingservicesupplies.com/4-mobile-detailing-water-filters-for-2026-spot-free-rinsing) to achieve a perfectly dry surface.
Master the Proper Application Technique for Optimal Results
Use a quality microfiber or foam applicator pad designed for coatings. Pour a few drops of the 2026 nano-ceramic coating onto the pad—think of it as applying a thin layer of paint—more isn’t better. Practice applying a light, even pressure, moving smoothly in one direction; this prevents streaking and ensures uniform coverage. Remember, overlapping passes can create uneven thickness, so work methodically.
Work in small sections, like the size of a credit card, to keep control over the product. After applying, wait the recommended time (usually 1-2 minutes) for the coating to activate, then wipe off excess with a clean microfiber towel. This step is akin to buffing out excess polish—too much can leave streaks, too little leaves residue. Consistency and patience during this process result in a glossy, durable finish.
For intricate areas like trim edges or around decals, use a detail brush dipped lightly in the coating, similar to applying paint with a fine-tipped brush for detail work. Avoid over-applying; remember, this isn’t about coating the entire section thicker but about proper layer thickness to achieve maximum protection without haze.
Secure and Maintain Your Coating for Longevity
Ensure that the coating cures properly by avoiding water exposure for at least 12 hours. For best results, park your vehicle in a shaded, dust-free environment. Think of this curing phase like letting paint dry; patience here prevents imperfections.
Regular maintenance is crucial. Use a pH-balanced car wash solution and avoid harsh cleaners that can degrade the coating. For touch-up or quick cleans, opt for quick detailers designed for ceramic coatings, such as those detailed in [best quick detailers for ceramic coatings](https://cardetailingservicesupplies.com/5-best-2026-quick-detailers-for-ceramic-coated-cars), which help refresh the gloss without compromising the protection.
Address stubborn water spots or residue promptly with safe removal techniques, using products recommended in [how to remove water spots safely from expert paint](https://cardetailingservicesupplies.com/how-to-remove-2026-water-spots-safely-from-expert-paint). Proper wash routines and periodic reapplication of protective products will extend the coating’s lifespan, ensuring your trim and paint stay pristine and protected from the elements.When it comes to car detailing, many enthusiasts operate on misconceptions that can compromise their results. For example, a prevalent myth is that using the most expensive auto detailing products automatically guarantees a superior finish. In reality, even budget-friendly car wash soaps and polishes can deliver professional results if applied correctly, provided they are suited to the specific surface. Relying solely on high-end products without proper technique can be a costly mistake, especially if the products don’t match the vehicle’s material or condition. Another common trap is neglecting prior surface preparation; skipping a thorough cleaning or misusing a clay bar can leave contaminants that undermine paint correction or ceramic coating adhesion. These nuances are often overlooked by DIYers eager to jump into paint correction or coating application but can lead to uneven finishes or peeling coatings. Advanced detailers understand that the key isn’t just the products but the proper sequence and technique—such as correct panel-by-panel polishing or curing times for protective films—that make the difference. Many believe that paint correction is a quick fix, but it’s a meticulous process requiring careful assessment of defects, choice of abrasives, and polishing pads to avoid creating swirl marks or haze.
Are there hidden risks in DIY ceramic coating applications that professionals avoid?
Absolutely. Proper surface prep is critical; applying a coating over uncleaned or improperly leveled paint can trap contaminants, leading to high spots or uneven gloss. Moreover, improper curing—like exposing the freshly coated surface to water or dust—can compromise adhesion, resulting in premature failure. A study published in the Journal of Coatings Technology & Research emphasizes that the longevity of ceramic coatings heavily depends on precise application and curing protocols (https://www.springer.com/journal/11998). Expert techniques involve controlled environment curing and using dedicated mobile detailing equipment to maintain optimal conditions during application. Therefore, understanding the hidden nuances—from choosing the right polishing compounds to setting up a dust-free workspace—is essential for achieving a durable, flawless finish. If you’re serious about professional results, investing in the right tools, such as a quality mobile detailing generator or specialized spray guns, can make or break your project.
Have you ever fallen into this trap? Let me know in the comments. Delving into these nuances can elevate your craftsmanship, so don’t shy away from learning more about the details that matter most in high-quality car care.Maintaining your car detailing arsenal isn’t just about the initial investment; it’s about long-term performance and reliability. Investing in high-quality tools, properly caring for them, and selecting the right products ensure consistent, professional results. Personally, I rely heavily on a few key pieces of equipment that have proven their worth over time, especially in demanding environments like West Los Angeles, where dust, sun, and urban grime present unique challenges.
Why Choosing Reliable Equipment Is a Game-Changer
For example, having a durable mobile detailing generator from our recommended list ensures I can operate anywhere without interruptions. This investment pays off in efficiency and quality, especially when performing large-scale or on-site services. Similarly, investing in ergonomic brushes and foam pads tailored for specific tasks avoids unnecessary wear and provides better control, leading to pristine finishes every time.
How do I maintain my tools over time? Detailing involves more than just cleaning your car; it demands keeping your equipment in prime condition. Regularly cleaning sprayers and polishers prevents buildup that can clog nozzles or create streaks. Using designated degreasers from top-grade degreasers helps in maintaining spray guns, ensuring consistent application. Additionally, replacing worn-out pads or buffers before they degrade your work is crucial. Marking a routine schedule for tool inspection and maintenance, like checking the electrical cords of power tools or the seals on water tanks, prolongs equipment lifespan and minimizes downtime.The Future Looks Bright with Advanced Equipment
Automation and smarter tools are on the horizon. Expect to see more AI-driven diagnostics and IoT-enabled devices that can track usage, predict failures, and suggest optimal maintenance cycles. For example, mobile water filtration systems that monitor purity levels in real-time are becoming more accessible, optimizing rinse quality and reducing water waste. Embracing these innovations now prepares your business for future growth and competitive edge.
Questions to Boost Your Maintenance Routine
How do I keep my detailing supplies and equipment running smoothly over months and years? It’s simple: establish a routine that includes thorough cleaning after every use, scheduled checks for wear and tear, and occasional professional calibrations. Using online resources such as trusted supplier guides helps in choosing the right tools and parts for maintenance. Also, don’t underestimate the power of proper storage—using dedicated organizers and climate-controlled cabinets reduces corrosion and damage, especially for sensitive electronics and polishers. Remember, the longevity of your equipment directly affects the quality you deliver to clients. Make it a habit to maintain your supplies proactively and stay ahead of issues before they escalate.
Throughout my journey into DIY car detailing, I’ve uncovered that even the most advanced nano-ceramic coatings, like those emerging in 2026, are only as good as the care taken during surface preparation and application. The key insight? Precision and patience transform a simple coating into a lasting shield that elevates your vehicle’s appearance and value. From meticulous cleaning routines to understanding the nuances of curing and maintenance, every step contributes to professional-level results that last. Remember, investing effort at each stage isn’t just about protecting your car—it’s about developing a skill set that turns ordinary car care into an art form.